Get Started With Golang Language
•25 min read
- Languages, frameworks, tools, and trends

Golang is a modern programming language known for its simplicity, efficiency, and performance. It’s a popular choice for building high-performance web applications, network servers, and other complex software systems.
Getting started with Golang entails knowing the basics, and some. In this article, we’ll be discussing Go's data types, initialization, standard library, concurrency with goroutines and channels, error handling with panic and recover, and context package for managing long-running operations. You'll gain a strong understanding of Go's key features and how to build scalable and reliable software applications with it.
The source code discussed is kept in the GitHub repository. It can be cloned for future reference.
Why use Golang?
Golang (aka Go) combines C-level efficiency and speed with a more modern and user-friendly syntax, similar to Python. It has a smart built-in garbage collection to optimize memory usage and reduce manual memory management.
Go is a strongly-typed, strongly standard compliant language that provides smart pointers and strictly adheres to a simple coding standard. For example, your code won’t even compile if you have any unused variable, which is generally not the case in other languages. Its official documentation provides a comprehensive guide for beginners to start learning the language.
Golang aside, there are many exotic and user-friendly programming languages like Python, C#, and Java, among others. Why should you bother learning it when you can do the same thing with these?
The answer is simple. Although all the other languages are Turing Complete, each has its unique features, strengths, and weaknesses and is better suited to specific use cases and applications.
Python, for example, is well-known for its ease of use and versatility, but it may not be the best choice for developing high-performance applications that require low-level control over hardware resources. Similarly, while Java is a popular language for developing enterprise software, it may not be the best choice for creating fast and lightweight web applications.
Learning a new programming language like Golang can increase your knowledge of and skill in software development by giving you new perspectives and fresh insights. As a result, you can become a more flexible and in-demand developer.
Setting up Golang
We’re getting started with Golang by setting it up. Here, we are using Arch Linux, so it is pretty easy (pacman -S go) to install it globally. If you are on macOS or other POSIX operating systems, you can search for it using “Install latest golang on XXX” where XXX is your operating system.
Once this is done, you can confirm it using the go version command:
$ go version
go version go1.20.4 linux/amd64Workspaces
In Go, the GOPATH environment variable is used to specify the location of the Go workspace. The Go workspace is a directory hierarchy where Go source code, packages, and binaries are stored. By default it will be in $HOME/go.
Here’s an example of 3 levels of this hierarchy:
$ /usr/bin/tree -L 3 $HOME/go
/home/tbhaxor/go
├── bin
│   ├── dlv
│   ├── gomodifytags
│   ├── gopls
│   ├── gotests
│   ├── impl
│   └── staticcheck
└── pkg
    ├── mod
    │   ├── cache
    │   ├── github.com
    │   ├── golang.org
    │   ├── gopkg.in
    │   ├── go.starlark.net@v0.0.0-20220816155156-cfacd8902214
    │   ├── honnef.co
    │   └── mvdan.cc
    └── sumdb
└── sum.golang.orgThe reason Go uses GOPATH to save everything is to follow the concept of a workspace, which is a central location for managing Go projects and dependencies.
But this is not a hard and fast rule. Starting from Go 1.11, Go introduced module support which allows you to manage dependencies outside of GOPATH using a go.mod file. With modules, you can specify dependencies and versions on a per-project basis which provides a more modern and flexible approach to dependency management. However, GOPATH is still used for projects that haven't adopted modules or for non-module-based workflows.
In Golang, everything starts with packages and modules so we will also use this new approach to work with it.
“Hello world”
Let’s start by creating a module directory and initializing the Go module in it using go mod "init <module name>"

Now, you can verify the contents of the go.mod file in the current directory.

Rules for naming modules
The naming module can be used with or without an internet domain (as shown above). To successfully create the module, a few rules need to be followed.
- Go module names should be a valid internet domain or a path within a valid domain.
Example: "go mod init example.com/myproject"
- You can use any valid internet domain for module names, even if it doesn't exist on the internet. Example: "go mod init example.com/myproject"
- If you don't have an internet domain, you can use a non-existent domain like local or localhost for local projects. Example: go mod init local/myproject or go mod init myproject will also work.
- The module name should be unique within the Go ecosystem to avoid conflicts.
Example: "go mod init github.com/yourusername/myproject"
Packages and main package
In Go, a package is a way to organize and reuse code. It is essentially a collection of Go source files that have been grouped together to provide related functionality. For example, in the string package, you can have multiple files, each with a different function related to string operations.
These packages can contain functions, variables, constants, types, and other packages. You can define the struct types in types.go and constants in the constants.go file. This can help you remember which file contains the declaration you’re looking for. It can also aid co-developers in navigating code.
The main package in Go is a special package that serves as the starting point for running a Go program. It is the package that contains the main function which serves as the execution starting point. The main package differs from the others in that it generates an executable binary when built. Other packages, known as library packages, are not directly executable on their own but provide reusable code that can be imported and used by other packages or the main package.
Now, create a file in the current directory with any name you want. We’re using main.go to specify explicitly that this file will contain the application's entry function.
Assign the first line to the package main.
package main

import (
	"fmt"
	"os"
)

// main is like any other programming language,
// is the application's entry point.
// Exactly 1 definition of this function is required in main package
func main() {
	// check user has provided any
	// https://pkg.go.dev/os@go1.20.5#Args
	// https://pkg.go.dev/builtin#len
	if len(os.Args) > 1 {
		// take the second element of the array and print hello to user
		// https://pkg.go.dev/fmt@go1.20.5#Printf
		fmt.Printf("Hello, %s\n", os.Args[1])
	} else {
		// if no argument is provided, print message with new line
		// https://pkg.go.dev/fmt@go1.20.5#Println
		fmt.Println("Hello Guest")
	}
}In the above code, we’re using the built-in function len() from Golang runtime to check if the length of CLI arguments is greater than 1. Even if the user doesn’t provide any input, it will still have 1 element, which is the name of the file itself.
There are two ways to run the code: build first and then run it or simply use go run . in the module directory. This is used to compile and run a Go program in one step. When learning or testing the code, you may find it more convenient to use this instead of building first and then running the binary file.

Note: You can use the following command to print the actual path of the compiled code from your temp directory.
fmt.Println(os.Args[0])If you want to build the executable first and then run it, you can achieve this using go build. command. This will create the executable file in the current directory which you can verify by file command. You can now run the executable file as any other executable file.
In Linux, if the binary file is not in the PATH directory, you will need to execute this binary file using ./helloworld instruction.

Function name convention
In Golang, the capitalization of a function name affects its visibility. Functions with the first character in uppercase are exported during compilation, which means they can be called from other packages. Functions with names that begin with a lowercase letter are not exported, so they can only be invoked from within the package in which they are declared.
Let’s say we have otherpackage with the following Golang example code in it:
package otherpackage

import "fmt"

// greetname will print hello to name
func greetname(name string) {
	fmt.Printf("Hello, %s\n", name)
}

// greetguest will print a simple string
func greetguest() {
	fmt.Println("Hello, Guest")
}

// Greet will print greetguest or greetname based on length of names
func Greet(names []string) {
	if len(names) == 0 {
		greetguest()
	} else {
		for _, name := range names {
			greetname(name)
		}
	}
}You can now use the Greet method outside of this package. Here’s a demonstration of how to use this function in the main package of the same module.
package main

import (
	"os"

	"funcname/otherpackage"
)

func main() {
	// call the exported function
	otherpackage.Greet(os.Args[1:])
}
Variables and datatypes
Variables are used in programming languages to temporarily store data that can change during runtime. They are given a name and a value, and can be used to refer to that value throughout the program. Variables can help with a variety of tasks, including:
- Accepting inputs from the users at runtime.
- Maintaining state records.
- Data transfer between functions.
Unlike other languages, in Go you can define variables using various syntaxes depending on the context. Here are some different ways to define a variable:
- Standard declaration is used to declare a variable with a specific data type using the var keyword.
- Type inference is used to declare a variable and let the Go compiler infer its data type based on the assigned value using the := syntax.
- Multiple variable declaration is used to declare multiple variables with their respective data types using the var keyword within parentheses.
- Short declaration for multiple variables is used to declare and assign multiple variables in a concise way using the := syntax with comma-separated values.
Here is an example of each of the following ways discussed above:
package main

import "fmt"

func main() {
	// Golang forbids unused variables
	// uncomment following line to give compile-time error
	// var unused_var string

	// Standard declaration: var variableName dataType
	var age int

	age = 20 // reassigning values to the variable

	// Type inference: variableName := value
	name := "John"

	// Multiple variable declaration: var ( variable1 dataType1 variable2 dataType2 )
	var height, weight float64

	// Short declaration for multiple variables: variable1, variable2 := value1, value2
	country, population := "INDIA", 142.03

	// Printing the values of the variables
	fmt.Println("Age:", age)
	fmt.Println("Name:", name)
	fmt.Println("Height:", height)
	fmt.Println("Weight:", weight)
	fmt.Println("Country:", country)
	fmt.Println("Population:", population)

}
If you are a developer who declares variables first and defers its usage, you will face problems when initially learning Go. This is because it is a compile-time error to declare a variable and not use it anywhere in the code. This rule helps to ensure that the code remains clean and avoids unnecessary clutter.
var unused_var int 
When you parse the code with a go-staticcheck tool, it will warn you if you initialize variables like this. As stated in the warning, this "literal" assigning right after declaration can be merged.

Instead of this, you can use:
var age int = 20

// or by default integer literals are typed as int
var age = 20Local variables are stored in the stack memory, which is automatically deallocated when the function execution is finished. Global variables, including those allocated with the new() function, are persistently stored in heap memory.
All these variables seen so far are initialized on the stack and are cleared as soon as this function goes out-of-scope.
Garbage collection
Garbage collection is an automatic memory management mechanism used by some programming languages to reclaim memory that the program no longer uses. It is required to ensure efficient memory utilization, prevent memory leaks, and relieve programs of the burdens of manual memory management. It guarantees no memory related error as it is implemented by the developers of the programming language.
Although garbage collection is executed automatically by Golang runtime, you can also run it manually using the runtime standard library. You can try the following code as an example:
package main

import (
	"fmt"
	"runtime"
)

const maxHeapSize = 2 * 1024 * 1024 * 1024 // 1GB

func runGC() {
	fmt.Println("--- Demonstrating GC ---")
	// create 2 gb of junk memory
	var junk = make([]byte, maxHeapSize)
	fmt.Println(junk[:10])

	// run gc manually on the allocated
	fmt.Println("Running GC")
	runtime.GC()
	fmt.Println("\nGC Finished")
}Now, call runGC() in the main function.
package main

 func main() {
+       runGC()
}Note: GC runs a garbage collection and blocks the caller until the garbage collection is complete. It may also block the entire program.
Run the program with the GODEBUG environment variable set to gctrace=1 option. It instructs the Go runtime to emit a single line to standard error after each garbage collection, containing a summary of the amount of memory collected and the length of the pause. The gctrace flag is one of several debugging flags available in Go. You can learn more about these flags by reading the documentation for the runtime package.

At first, each of these lines may look like gibberish. But once you get the hang of the format, it will make sense. This is debug information printed by the runtime after clearing the memory. The output is a population of the following template:
gc # @#s #%: #+#+# ms clock, #+#/#/#+# ms cpu, #->#-># MB, # MB goal, # MB stacks, #MB globals,
# Pwhere the fields are as follows (taken from the runtime pkg documentation):
        gc #: the GC number, incremented at each GC.
	@#s: time in seconds since program start.
	#%: percentage of time spent in GC since program start.
	#+...+#: wall-clock/CPU times for the phases of the GC.
	#->#-># MB: heap size at GC start, at GC end, and live heap.
	# MB goal: goal heap size.
	# MB stacks: estimated scannable stack size.
	# MB globals: scannable global size.
# P: number of processors used.Stack and heap
Stack and heap are two important memory management concepts in Go, as they are in many other programming languages. As you can see, the variables are defined in the stack so far. But what exactly is a stack?
The stack is a region of memory where local variables and function call information are stored. When a function is called, a stack frame is allocated to store its local variables, return address, and other relevant information. The stack is arranged in a last-in-first-out (LIFO) fashion, which means that the most recently pushed item is the first to be popped off.
The heap is a memory region that is used for dynamic memory allocation and deallocation. It is used to store data that must persist beyond the lifetime of a single function call or when the data size is unknown at compile time. The Go runtime manages the heap, which allows for flexible memory allocation. The heap is used in Go to store complex data types such as structs, slices, maps, large arrays, and pointers.
In Go, when you create an object using the new keyword or built-in functions like make, memory is allocated on the heap. Unlike languages like C, the Go garbage collector automatically manages deallocation to prevent memory leaks.
The stack is used in Go to store primitive data types such as integers, booleans, and pointers to data on the heap. Allocating and dealing with memory on the stack is faster than on the heap because it is managed efficiently and has a fixed size.
Pointers
Like every programming language, pointers in Golang are variables that hold the memory address of value. This value can either be in the stack or heap. They just store their address. The pointer itself is allocated on the stack.
Pointers come in handy when you want to access and modify data in memory indirectly. Below, we will be using references to pass values to functions. This is an interesting technique for reducing copying time for large data structures such as structs or arrays.
Let's say we have a large array of integers and we want to modify its elements. Instead of making a copy of the entire array, we can use a pointer to efficiently access and modify the original array in memory.
package main

import (
	"fmt"
)

func pointers() {
	fmt.Println("--- Demonstrating Pointer Variables ---")
	// Create an array of integers
	array := [3]int{1, 2, 3}
	fmt.Println(array)

	// Create a pointer to the array
	pointer := &array

	// Modify the second element of the array using the pointer
	// * is used to dereference the pointer
	(*pointer)[1] = 10

	// Print the modified array
	fmt.Println(array)

	// allocate new int type pointer
	num := new(int)
	*num = 10
	fmt.Println(num, *num)
}Now, you have to call this function from the main function of the program to see the following output.

Variable scopes
In Go, variables have different scopes that determine where they can be accessed within the code. The main scopes in Go are local, global, and file/package scope.
- Local variables have a limited scope and are accessible only within a specific block of code, typically enclosed within curly braces { ... }. Once the execution of the block is complete, local variables are deallocated from the stack memory.
- Global variables, on the other hand, have a scope that spans the entire lifetime of the program. They are accessible from any part of the codebase and are stored in the heap memory. Global variables are typically used when a value needs to be shared across multiple functions or packages.
- Package scope refers to variables that are defined in a different package. These variables can be accessed by all the functions within the same file or package and can be accessed outside the package only if they start with upper-case letters. They have a similar lifetime to global variables and are often used for configuration settings or constants that are used throughout the codebase.
When there are multiple variables with the same name in different scopes, the most closely defined variable takes priority. This means that if a local variable is defined within a block, it will overshadow any variable with the same name defined in a higher scope.
import "fmt"

// you cannot use shorthand := initialization on global scope
var globalVariable = 10

func printVariables() {
	fmt.Println("--- Demonstrating Variable Scopes ---")
	localVariable := 5

	// Print global and local variables within main function
	fmt.Println("Global:", globalVariable)
	fmt.Println("Local (main):", localVariable)

	{
		// Declare local variables within compound block
		localVariable := 7
		anotherLocalVariable := 15
		globalVariable := 20

		// Print local and global variables within compound block
		fmt.Println("Local (block):", localVariable)
		fmt.Println("Another local (block):", anotherLocalVariable)
		fmt.Println("Global (block):", globalVariable)
	}

	// Print local and global variables after the compound block
	fmt.Println("Local (main, after block):", localVariable)
	fmt.Println("Global (main, after block):", globalVariable)
}You need to call the function in the main package as shown below. This will give you the following output:
package main

func main() {
	variableInitialization()
	printVariables()
}
You are seeing the output of variable initialization because we have written the code in the same package but different file, scope.go.
Arrays, slices, and hashmaps
Arrays are a fixed-length data structure that can hold elements of the same type. They are declared with a type and a size. For example, the following declares an array of 5 integers:
var numbers [5]intThe entries/elements of an array can be accessed by their index, which starts from 0. For example, the following code will print the first element of the numbers array:
fmt.Println(numbers[0]) // 0Since this array is initialized with all zero values, any value you use for index from 0 →4 will print 0 on the stdout.
package main

import "fmt"

func arrays() {
	fmt.Println("--- Demonstrating Arrays ---")

	// declare array of 5 elements of type int which are initialized to 0
	var numbers [5]int

	// print first element of the
	fmt.Println(numbers[0])

	// underscore variables are ignored from unused variables
	// proof all the elements are zero
	sum := 0
	for _, el := range numbers { // this can also be for i := 0; i < len(numbers); i++
		sum += el
	}
	fmt.Println(sum)

	// length of array, here it will be 5
	fmt.Println(len(numbers))

	// this will give a compile-time error, going beyond allocated area
	// numbers[5] = 10; // uncomment this to get error

	// set value at particular index, only int values are allowed
	numbers[2] = 100

	// print whole array at once, this is allowed
	fmt.Println(numbers)
}
If you are unsure about the number of elements to store and need a data structure that can be resized, an array is not a good choice because it cannot be resized. In such cases, it is best to use a slice that supports dynamic resizing.
Slices are declared with a type and a range of elements. For example, the following declares a slice of 3 integers:
var slices []int = []int{1, 2, 3}
// or you can use the array
var slices = numbers[0:3] // here it is starting from the first elementAt this time, both the length and capacity of this slice will be 3. But as soon as you append to the slice, it will multiply the capacity of slice with 2, copy content, and append the item at the end of the slice.
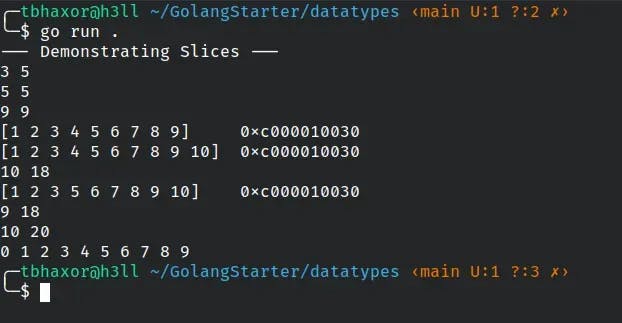
package main

import "fmt"

func slices() {
      fmt.Println("--- Demonstrating Slices ---")
	var numbers [5]int // just for demo

	// initialize slice from the length
	var slice1 []int = numbers[:3]

	// print length and capacity of slice1
	fmt.Println(len(slice1), cap(slice1))

	// convert whole array to slice
	var slice2 []int = numbers[:]

	// print length and capacity of slice2
	fmt.Println(len(slice2), cap(slice2))

	// you can have slice without any array like this,
	// if you remove the right hand side, that will be length 0 capacity 0 slice
	var slice3 []int = []int{1, 2, 3, 4, 5, 6, 7, 8, 9}

	// print length and capacity of slice3
	fmt.Println(len(slice3), cap(slice3))

	// print slice before append
	fmt.Printf("%v\t%p\n", slice3, &slice3)

	// append element to the last of slice
	slice3 = append(slice3, 10)

	// print slice after append
	fmt.Printf("%v\t%p\n", slice3, &slice3)

	// print length and capacity of slice3
	fmt.Println(len(slice3), cap(slice3))

	deleteIndex := 3

	// deleting third index from the slice
	slice3 = append(slice3[:3], slice3[deleteIndex+1:]...)

	// print slice after delete
	fmt.Printf("%v\t%p\n", slice3, &slice3)

	// print length and capacity of slice3
	fmt.Println(len(slice3), cap(slice3))

	// create slice with different length and capacity
	var slice4 = make([]int, 10, 20)

	// print length and capacity of slice2
	fmt.Println(len(slice4), cap(slice4))

	// this will iterate until length is reached

	for idx := range slice4 {
		fmt.Printf("%d ", idx)
	}
	fmt.Println()
}
Hashmaps are a type of data structure that associates keys with values. This gives the option of selecting the type of key. In terms of hashmaps, for example, the type of key of slices and arrays is fixed to integer type with zero. Hashmaps are declared with a type for the keys and a type for the values.
For example, the following declares a hashmap that maps strings to integers:
// both key-value pair are string type
// you can also use make, make(map[string]int)
var myMap map[string]string = map[string]string{}Elements of a hashmap can be accessed by their key. For example, the following code will check if the key "Alice" exists in the people hashmap and return its value if it does:
// get value from the map
value, exists := myMap["Alice"]
if exists {
	fmt.Println(value)
} else {
	fmt.Println("Key not found") // this will be printed
}Hashmaps are a very efficient way to store and retrieve data, but they can be slower than arrays or slices for some operations. For example, iteration using loop and sorting.
package main

import (
	"fmt"
)

func hashMaps() {
	fmt.Println("--- Demonstrating Hashmaps ---")

	// both key-value pair are string type
	// you can also use make, make(map[string]int)
	var myMap map[string]int = map[string]int{}

	// get value from the map
	value, exists := myMap["Alice"]
	if exists {
		fmt.Println(value)
	} else {
		fmt.Println("Key not found") // this will be printed
	}

	// set or update value for the key Alice
	myMap["Alice"] = 20

	// print entire map
	fmt.Println(myMap)

	// when you are certain the key exists
	// feel free to ditch if-else
	value = myMap["Alice"]
	fmt.Println(value)

	// gives the number of pairs
	fmt.Println(len(myMap))

	// range based for loop gives key on left and value on right side
	for key, value := range myMap {
		fmt.Printf("Key=%s\tValue=%d\n", key, value)
	}

	// delete the key if it exists
	delete(myMap, "Alice")
	fmt.Println(len(myMap))

}
Functions
Functions are blocks of code that are used to encapsulate common logic and make it reusable in order to improve readability and make code look more concise. They usually sit in the execution memory, but are called using a special operator, (), also called call operator.
The syntax for declaring a function in Golang is as follows:
func function_name(parameter_list) (return_type) {
  // function body
}- function_name is the name of the function.
- parameter_list is a list of parameters that the function takes.
- return_type is the type of the value that the function returns.
- // function body is the code that is executed when the function is called.
In Golang, slices and hashmaps are passed by reference. This means that when you pass a slice or hashmap to a function, the function receives a reference to the slice or hashmap rather than a copy. So any changes made to the slice or hashmap by the function will be reflected in the original slice or hashmap.
- init() function
The init() function is a special function that is called before the main() function. It is used to initialize any variables or other resources that must be available prior to the execution of the main() function.
var i = 10

// called before main()
func init() {
	fmt.Println("Initialization function for main")
	i = 20
}If the init() function is declared in the importing package, it will be called before the init() function in the imported package. This is because the Go compiler will first initialize all of the imported packages and will then initialize the importing package.
// called before init of main package
func init() {
	fmt.Println("Initialization function for otherpackage")
}- Multiple returns
A function may return multiple values simultaneously. This can be beneficial for functions that need to return multiple pieces of data or that need to return both the result and an error value. If you want a function to return more than one value, simply list the return values in the function signature, separating them with commas.
The function below returns two values:
func multiple_returns(a, b int) (int, int) {
	sum := a + b
	product := a * b
	return sum, product
}In the funcname workspace, I've put an arithmetic package in place. Some of the functions like Add, Sub, and Prod can be defined straightforwardly. However, we have added a safeguard for 0 divisors in the Div function and it now returns an error in that circumstance. The Do function returns a number of values.
package arithmetic

import "errors"

func Div(a, b int) (float32, error) {
	if b == 0 {
		// divide by zero is undefined
		// if user provided this value, then send 0 and error
		return 0, errors.New("divide by zero error")
	}

	// since division can be fractional, convert operands to float32()
	// if b != 0 then we can safely divide and return value
	// error interface is allowed store and return nil values
	// only pointers and error can be assigned to nil
	return float32(a) / float32(b), nil
}When the code is executed, the output should be as follows:

- Internal and external functions
A function is exported if its name starts with a capital letter. This means that the function can be used by other packages. If a function's name does not start with a capital letter, it is not exported and can only be used by the package in which it is defined.
// this will not be exported
func helloWorld() {
	// body goes here
}

// this will be exported
func HelloWorld() {
	// body goes here
}We have already used this in the Packages and Main Package section. You can check the funcname workspace in the code repository.
- Main function vs other functions
The main function is special because it is the entry point for every Golang program. This means that the main function is the first function that is executed when the program starts. It also differs from other functions in that it does not have to return a value.
- Deferred functions
The defer keyword is used to delay the execution of a function until the surrounding function completes. It is executed in LIFO order to perform cleanup tasks, handle panics, and more.
There are two ways to declare defer functions in Golang: anonymous defer functions and named defer functions. Anonymous defer functions are declared without a name. They are often used for releasing resources or recovering from panics. On the other hand, named defer functions are declared with a name. They are used for more complex tasks such as logging or sending an email.
The following code snippet shows both examples:
func main() {
	// defer function 1
	// order of execution 3
	defer func() {
		fmt.Println("world")
	}()

	// defer function 2
	// order of execution 2
	defer fmt.Println("hello")

	// open file
	file, _ := os.Open("somefile.txt")

	/**
	Do some changes in the file
	*/

	// close the file as function ends
	// defer function 3
	// order of execution 1
	defer file.Close()
}
Structs
In Golang, a struct is a user-defined data type that is made up of different types. These can include arrays, hashmaps, other structs, and basic data types.
Below, the Person struct has two fields: name and age. The name field is a string and the age field is an unsigned integer.
type Person struct {
	name string
	age  uint
}Any function can initialize them as shown below. While defining, you can opt to omit the ampersand (&) sign before the struct name. To make things simpler when dealing with pass by reference, we have implemented it this way and return the object's pointer.
person := &Person{name: "Gurkirat Singh", age: 21}Like function, the struct itself and its properties can be exported by capitalizing their first character.
To print the whole struct, you can use the fmt.Println() or fmt.Printf() function with the %+v format verb. This will print the struct with its field names and values. For example, the following code prints the whole Person struct:
// print entire struct
fmt.Printf("%+v\n", person)

// print selective fields of struct
fmt.Printf("Name=%s\t\tAge=%d\n", person.name, person.age)Updating a value in a struct in Golang is as simple as assigning a new value to the field. For example, the following code updates the value of the name field in the Person struct:
// change value
person.name = "Amit"
fmt.Printf("%+v\n", person)- Methods in structs
Methods are functions that are associated with a struct. They can be used to access or modify the data in a struct. Like regular functions, they are defined using the func keyword. However, methods also have a receiver, which is the struct that the method is associated with. The receiver is specified after the func keyword and is enclosed in parentheses.
func (p *<struct type>) methodName() {
	// implementation here
}For example, the following code defines a method for the Person struct called whoami():
// this a method attached to each instance of struct
func (p *Person) whoami() {
	fmt.Printf("Hi! I am %s and %d years old\n", p.name, p.age)
}And then, you call as you call methods in other OOPs-based languages.
<object>.<method>().

// call method of person instance
person.whoami()- Compose struct types using embedding
Struct embedding is a technique for creating a new struct that contains the fields of another struct. This can help with code reuse and the creation of more complex data structures.
When you embed a struct, you do not make a duplicate of the embedded struct. You are instead making a reference to the embedded struct. This means that any changes you make to the embedded struct are mirrored in the embedding struct.
For example, the following code defines a struct called Employee that embeds the Person struct:
// define struct with embedding Person struct
type Employee struct {
	Person  // embedding happens here
	email   string
	website string
}Here is an example of how to instantiate the Employee struct:
// instantiate Employee struct and pass person information
// since person was point, it needs to be dereferenced
employee := &Employee{Person: *person,
	email:   "info@tbhaxor.com",
	website: "https://tbhaxor.com",
}As you can see, the Employee struct has access to all of the fields of the Person struct. You can now access properties of Person either using direct ".<age|name> or .Person.<age|name>".

Ultimately, the decision of whether or not to use struct embedding in your Golang code is up to you. There are benefits and drawbacks to both.
Benefits:
- Code reuse: It allows you to reuse the fields and methods of an existing struct in a new struct. This can help to reduce code duplication and improve code readability.
- Modularity: It helps make code more modular by allowing you to break down complex types into smaller, more manageable ones, enabling code to be easier to understand and maintain.
Drawbacks:
- Increased complexity: If done carelessly, it will make code more complex, especially when you embed multiple structs.
- Ambiguity: If you are embedding structs with the same field names, there can be ambiguity in the field you are referring to. This can lead to errors in your code.
The programmer needs to weigh the benefits and drawbacks before making a decision.
package main

import (
	"fmt"
)

// define struct with two field
type Person struct {
	name string
	age  uint
}

// this a method attached to each instance of struct
func (p *Person) whoami() {
	fmt.Printf("Hi! I am %s and %d years old\n", p.name, p.age)
}

// define struct with embedding Person struct
type Employee struct {
	Person  // embedding happens here
	email   string
	website string
}

func main() {
	// initialize object of Person struct with values
	person := &Person{name: "Gurkirat Singh", age: 21}

	// print entire struct
	fmt.Printf("%+v\n", person)

	// print selective fields of struct
	fmt.Printf("Name=%s\t\tAge=%d\n", person.name, person.age)

	// change value
	person.name = "Amit"
	fmt.Printf("%+v\n", person)

	// call method of person instance
	person.whoami()

	// instantiate Employee struct and pass person information
	// since person was point, it needs to be dereferenced
	employee := &Employee{Person: *person,
		email:   "info@tbhaxor.com",
		website: "https://tbhaxor.com",
	}
	fmt.Printf("%+v\n", employee)

	// access value of embedded struct directly
	// from employee object
	employee.name = "Amit Singh"
	fmt.Printf("%+v\n", employee)

	// methods also gets embedded
	employee.whoami()
}
Polymorphism using interfaces
Interfaces, which are collections of method signatures, are used in Golang to achieve polymorphism. Methods represent a type's behavior, whereas properties represent a type's state. Methods are polymorphic rather than properties because methods are more reusable. Any type that implements the interface, regardless of its state, can use a method. This makes it easier to create new types that can interoperate with existing types.
For example, the Shape2D interface defines methods on 2D shapes such as get area and perimeter:
type Shape2D interface {
	Area() float32
	Perimeter() float32
}The Shape2D interface has two methods, Area() and Perimeter(), that return float32 type. Any type that implements the Shape interface must implement the Area() method.
func print2DShapeDetails(shapes ...Shape2D) {
	for _, shape := range shapes {
		fmt.Printf("Area=%.3f\tPerimeter=%.3f\n", shape.Area(), shape.Perimeter())
	}
}The print2DShapeDetails() function takes an array of Shape2D interface as a parameter. This means that the function can be called with any type that implements the Shape2D interface.
Similarly, different struct types can be initialized with the same interface name and the same array if - and only if - they implement the same functions in their structs.
// instantiate all the structs in array
shapes := []Shape2D{
	&Square{size: 4},
	&Rectangle{length: 3, width: 4},
	&Circle{radius: 10},
	&Triangle{a: 3, b: 4, c: 5},
}Note: You can check the code in the polymorphism directory of the code repository for actual implementation of Area() and Perimeter() methods.
You can now call print2DShapeDetails() and provide it with the shapes slice as shown below.
print2DShapeDetails(shapes...)Type assertion
Type assertion is a powerful mechanism that allows developers to access the underlying concrete value of an interface variable. With type assertions, you can determine whether an interface variable holds a specific type and then perform operations based on that knowledge.
The syntax for a type assertion is:
value, ok := someInterfaceVariable.(desiredType) Here, value represents the underlying concrete value if the assertion is successful. ok is a boolean indicating whether the assertion succeeded. If you are certain about the successful assertion, you may omit the ok variable.
For example, the following code searches for an instance of Circle struct within the shapes slice. If it is found, it prints the index, radius, and calls print2DShapeDetails() function.
for idx, shape := range shapes {
      // check if the underlying type of Shape2D is Circle
	circle, ok := shape.(*Circle)
	if ok {
		fmt.Printf("Found circle shape at %d index\n", idx)
		fmt.Println("Radius of circle", circle.radius)
		print2DShapeDetails(circle)
		break
	}

}Switch statement
A switch statement combined with a type assertion can be used to execute different blocks of code based on the type of a variable.
The syntax for a switch statement with a type assertion is:
switch variable.(type) {
case type1:
	// Code to execute if the variable is of type1
case type2:
	// Code to execute if the variable is of type2
default:
	// Code to execute if the variable is not of type1 or type2
}

// or you can define the variable for the specific type in switch statement
switch v := variable.(type) {
case type1:
	// type of v is type1
case type2:
	// type of v is type2
default:
	// Code to execute if the variable is not of type1 or type2
}For example, the following code iterates through each shape and prints information about it, such as the radius, if a circle is found.
func getTypeDetails(shapes ...Shape2D) {
	for _, shape := range shapes {
		// 'shape.(type)' syntax is used within the type switch
		// to get the actual type of 'shape'.
		switch shape := shape.(type) {
		case *Circle:
			fmt.Printf("[Circle]\tr=%.2f\n", shape.radius)
		case *Triangle:
			fmt.Printf("[Triangle]\ta=%.2f\tb=%.2f\tc=%.2f\n", shape.a, shape.b, shape.c)
		case *Rectangle:
			fmt.Printf("[Rectangle]\tl=%.2f\tw=%.2f\n", shape.length, shape.width)
		case *Square:
			fmt.Printf("[Square]\ts=%.2f\n", shape.size)
		}
	}
}Once you have assembled the whole code, it will give you following output:

Panic and recover
Panic is a special function in Golang that is used to raise exceptions and stop the normal execution of the program immediately. Think of it as similar to “throw” or “raise” keywords in other languages. Panic is used to signal that an unrecoverable error has occurred, while recover is used to recover from a panic.
For example, we are parsing two command-line arguments and converting them to ints. If the user provided insufficient arguments or was unable to parse, it will immediately throw a panic with an error code.
func getInput() (int, int) {
	if len(os.Args) < 3 {
		// panic can accept type of any value
		panic("minimum 3 arguments required")
	}

	num1, err := strconv.ParseInt(os.Args[1], 10, 32)
	if err != nil {
		panic(err)
	}
	num2, err := strconv.ParseInt(os.Args[2], 10, 32)
	if err != nil {
		panic(err)
	}

	return int(num1), int(num2)
}The divide() function wraps the arithmetic.Div() function to ensure that any errors that occur during the division are handled gracefully. Panicking with the error message or an error object as shown below:
func divide(a, b int) float32 {
	if div, err := arithmetic.Div(a, b); err != nil {
		// if any error, panic the error
		panic(err)
	} else {
		return div
	}
}If you call these functions in the main(), it will generate the following output:

However, as previously stated, this error message does not appear graceful. In addition, if any file or database connection was open, it would have remained open until it timed out or executed extra commands to close the file or connection.
You can postpone a function that runs before the program is halted by panic and recover from it. If an error occurs, you can use os.Exit(1) to close the connection or handles, format and display the error message, and exit your Golang program.
The ideal position of defining defer function with recover() body is at the start of the function definition. This way, you are assured that it will recover errors anytime.
package main

import (
	"fmt"
	"os"
	"strconv"

	"funcname/arithmetic" // using Div function arithmetic package of funcname workspace
)

func divide(a, b int) float32 {
	if div, err := arithmetic.Div(a, b); err != nil {
		// if any error, panic the error
		panic(err)
	} else {
		return div
	}
}

func getInput() (int, int) {
	if len(os.Args) < 3 {
		// panic can accept type of any value
		panic("minimum 3 arguments required")
	}

	num1, err := strconv.ParseInt(os.Args[1], 10, 32)
	if err != nil {
		panic(err)
	}
	num2, err := strconv.ParseInt(os.Args[2], 10, 32)
	if err != nil {
		panic(err)
	}

	return int(num1), int(num2)
}

func main() {
	defer func() {
		switch err := recover().(type) {
		case string:
			fmt.Println("ERROR", err)
			os.Exit(1)
		case error:
			fmt.Println("ERROR", err.Error())
			os.Exit(1)
		}
		// // or you can simply print
		// if err := recover(); err != nil {
		// 	fmt.Println("ERROR:", err)
		// 	os.Exit(1)
		// }
	}()

	a, b := getInput()
	fmt.Println(a, "/", b, "->", divide(a, b))
}When developing a web server or other network server application, the recover() method is more frequently used because these servers must be able to handle errors gracefully and be kept alive at all times to prevent crashes even in edge cases.

Generics and templates
Since the release of Go 1.18, the team has made significant changes to the language, one of which is generics. Generics are a method of writing code that is not dependent on the specific types that are being used. Functions and methods of struct can now be written to use any of a set of types.
For example, the parseJson function takes a string body that could contain valid JSON data and decodes it into a value of type T. The type parameter T can be any type that can be decoded from JSON. The function returns a pointer to the decoded value.
func parseJson[T any](body string) *T {
	s := new(T)

	decoder := json.NewDecoder(bytes.NewBufferString(body))

	if err := decoder.Decode(s); err != nil {
		panic(err)
	} else {
		return s
	}
}JSON decoding is simple with struct and json tags.
We have copied Person and Employee structs and add JSON tags as shown below:
type Person struct {
	Name string `json:"name"`
	Age  uint   `json:"age"`
}

type Employee struct {
	Person
	Company string `json:"company"`
}Now, you call these functions in the main function and it will generate the output as shown below:
const (
	jsonString = `{"name": "Gurkirat Singh", "age": 21, "company": "Turing"}`
)

func main() {
	// type specified in the [ and ] will be replaced as the type in the function
	// on hover you will see it returns *Person
	person := parseJson[Person](jsonString)

	// here, on hover you will see it returns *Employee
	employee := parseJson[Employee](jsonString)

	fmt.Printf("%+v\n", person)
	fmt.Printf("%+v\n", employee)

} 
Generics can be used in struct types to create a generic struct that can be used with different types. For example, the following code defines a generic struct called GenericStruct:
type GenericStruct[T any] struct {
  x T
}Concurrency and parallel processing
Concurrency is the ability to handle multiple tasks at the same time, optimizing program performance by making efficient use of available resources. It meets the demand for faster software by allowing independent tasks like network handling and data processing to run concurrently. This reduces wait times and improves overall efficiency.
Golang supports concurrency natively, making it an excellent choice for concurrent applications. Concurrency is achieved through lightweight threads known as goroutines, which are managed by the Go runtime scheduler.
Developers can easily write goroutines to execute specific sections of code concurrently, while the rest is handled automatically. This built-in support simplifies concurrent programming by allowing developers to focus on the logic of their application rather than low-level thread management or the need for external libraries.
Creating a goroutine is simple: use the 'go' keyword followed by the function to execute, similar to 'defer' but replace it with 'go'.
package main

import "fmt"

func helloWorld() {
	fmt.Println("hello world!")
}

func main() {
	fmt.Println("Scheduling a goroutine")

	go helloWorld()
}There's a catch, however; when you execute this code, the "hello world" message will not be visible. Curious why? We cover this in the next section.
Wait groups
The main function acts as a "parent" of all other goroutines. When the parent dies, all of its children become orphaned and are garbage collected. This is defined in the Golang runtime and cannot be controlled via developers. However, there is a way to prevent goroutines from being deleted when the main function ends: WaitGroup.
As the name suggests it allows you to wait for a group of goroutines to finish before continuing, blocking further execution. You use the Add() method of the wait group to tell it to wait for a number of goroutines to finish, which is done by the Done() method. At last, in the caller function you can use Wait() to hold further execution until all goroutines are done executing.
package main

import (
	"fmt"
	"sync"
	"time"
)

func helloWorld(wg *sync.WaitGroup, sleepTime time.Duration) {
	// inform goroutine is completed
	// when this function is over
	defer wg.Done()

	fmt.Println("Hello World!!")
	time.Sleep(sleepTime)
}

func main() {
	wg := &sync.WaitGroup{}

	fmt.Println("Executing")
	// it will wait for 2 goroutines to be completed
	wg.Add(2)
	go helloWorld(wg, 2*time.Second)
	go helloWorld(wg, 1*time.Second)

	fmt.Println("Submitted 2 goroutines")

	// waits until all routines are done
	wg.Wait()

	fmt.Println("All Done")
}We have added time.Sleep() to simulate real-world latency introduced into the execution of a program because of network operations or user inputs.

Channels
Channels are a powerful tool in the Go programming language and are used for dealing with concurrency and synchronization issues. Concurrency allows multiple goroutines to run concurrently, but coordinating their activities can be difficult. Channels provide a solution by allowing goroutines to communicate with one another, allowing them to exchange data and synchronize their execution.
For instance, using a single goroutine to download a file from the internet would be inefficient because it would have to wait for the download to finish before moving on to other tasks. With channels, multiple goroutines can operate simultaneously. For example, you can continue downloading files in a different thread while continuing any code that doesn't depend on the downloaded file, or you can download files from various ranges.
Additionally, channels are essential for synchronization because they guarantee that multiple goroutines can access shared data in a secure manner. They establish communication patterns that regulate access to shared resources, preventing race conditions and preserving data integrity.
package main

import "fmt"

func sum(a, b int, result chan int) {
	result <- a + b
}

func main() {
	// create a channel of type int.
	c := make(chan int)

	// call goroutine using anonymous function.
	go func() {
		// send a value to the channel.
		c <- 10
	}()

	// receive the value from the channel.
	v := <-c

	// print the value.
	fmt.Println(v)

	// pass the channel to function
	go sum(10, 20, c)

	v = <-c
	fmt.Println(v)

}
Buffered channels
The channels can be either buffered or unbuffered (also known as "normal" channels). The channel in the previous section was an unbuffered channel. The key difference between the two lies in how they handle sending and receiving data.
Buffered channels allow non-blocking sends as long as the channel is not full, and non-blocking receives as long as there is data in the buffer. When you create a buffered channel, you specify its capacity.
Unbuffered channels enforce synchronization by blocking the sender until there is a receiver ready to receive the value, and vice versa. When you create an unbuffered channel, it has a capacity of 0.
// buffered channel with a capacity of 3
ch := make(chan int, 3)

go func() {
	// send until the buffer is full
	// (non-blocking until it is full)
	ch <- 1
	ch <- 2
	ch <- 3
}()

// receive as long as there's data in the buffer
result1 := <-ch // No block
result2 := <-ch // No block
result3 := <-ch // No block

fmt.Printf("%d\n%d\n%d\n", result1, result2, result3) 
Race between channels using select
The select statement in Go is like a switch statement for channels. It blocks until any of the channel operations are ready, and randomly selects one if multiple operations are ready. If you have experience with JavaScript, you may recognise it as the Promise.race() function.
package main

import (
	"fmt"
	"time"
)

func waitForMe(d time.Duration, done chan bool) {
	defer func() {
		// send data to channel to end blocking in main function
		done <- true
	}()

	time.Sleep(d)
}

func main() {
	// create channel for two different ask
	task1Chan := make(chan bool)
	task2Chan := make(chan bool)

	// submit two goroutines
	go waitForMe(2*time.Second, task1Chan)
	go waitForMe(1*time.Second, task2Chan)

	// wait for multiple tasks
	// execute whichever sends data early
	select {
	case <-task1Chan:
		fmt.Println("Task 1 completed")
	case <-task2Chan:
		fmt.Println("Task 2 completed")
	}
}
Conclusion
Go (Golang) offers an intuitive and simple syntax that encourages problem-solving and creativity, making it the perfect place for new programmers to start. Its integrated concurrency support and garbage collection contribute to its exceptional speed and efficiency, enabling programmers to create responsive applications with seamless multitasking.
Go's compatibility with microservices architecture adds to its allure by offering a compact yet potent platform for developing contemporary applications that are scalable and maintainable. Go's user-friendliness and versatile capabilities make it an appealing option for novice programmers. It enables them to confidently take on tasks ranging from straightforward exercises to complex microservice implementations.
Author
Gurkirat Singh
Gurkirat Singh is a polyglot developer who solves real-world problems and builds web applications for end-users to utilize his solutions. He has been in development for a long time and has almost learned everything from the open-source community. Now it is time for him to contribute back what he has learned and how he has learned through blog posts and walkthroughs.