In the previous article we researched MySQL Client / Server Protocol using WireShark. Now lets start to write our code in python to simulate MySQL native client. Final codes are here: Github repo
First of all we have to create MYSQL_PACKAGE class. MYSQL_PACKAGE class is the parent of all other package classes (HANDSHAKE_PACKAGE, LOGIN_PACKAGE, OK_PACKAGE and etc.)

It accepts resp parameter on initialization. Resp is the binary response received from the server in bytesarray type. One of the important and interesting method of this class is next method.

Method next reads a portion of the bytes from the binary response. When we call this method, it reads some portion of bytes and puts a pointer to the last position where reading ended (changes a value of self.start and self.end properties). When we call this method again, it starts to read bytes at the point it last stopped.
Method next accepts five parameters: length, type, byteorder, signed, and freeze. If freeze is True it reads some portion of bytes from the binary response but does not change pointer position. Otherwise it reads a portion of bytes with given length and changes the position of pointer. If length is None then method reads bytes until the end of response bytesarray. Parameter type can be int, str, and hex data types. Method next converts a portion of bytes into the appropriate datatype according to the value of type parameter.
Parameter byteorder determines the conversion of bytes to integer type. It is up to the architecture of your computer. If your machine is big-endian, then it stores bytes in memory from the big address to the little. If your machine is little-endian, then it stores bytes in memory from the little address to the big. Thats why we have to know the exact type of our architecture to be able to convert bytes to integer correctly. In my case, it is little-endian, that’s why i’ve set the default value of byteorder parameter to “little”.
Parameter signed is also used in conversion of bytes to integer. We tell the function to consider each integer as unsigned or signed.
A second interesting method of this class is encrypt_password. This method encrypts a password with the given algorithm.

This method accepts two parameters: s****alt and password. Parameter salt is the concatenation of two salt1 and salt2 strings from the Greeting Packet received from the server. And parameter password is the password string of mysql user.
In the official documentation password encryption algorithm is:

Here “20-bytes random data from server” is concatenation of salt1 and salt2 from the Greeting Packet received from server. To remember what the greeting packet is look at the previous article
Now I want to explain the encrypt_password method line by line.
bytes1 = sha1(password.encode(“utf-8”)).digest()
We are converting password string to bytes, then encrypting it with sha1 function and assigning to bytes1 variable. It is equal to this part of algorithm:

Then we are converting salt string into bytes and assigning to the concat1 variable.
concat1 = salt.encode(‘utf-8’)

Third line of the method is:
concat2 = sha1(sha1(password.encode(“utf-8”)).digest()).digest()

Here we are double-encrypting password string with sha1 function and assign it to the concat2 string.
Now we have two concat1 and concat2 variables. We have to concatenate them into one byte array:
bytes2 = bytearray()
bytes2.extend(concat1)
bytes2.extend(concat2)

Then we have to encrypt concatenated bytes with sha1 function and assign to the bytes2 variable.
bytes2 = sha1(bytes2).digest()

So we have two variables with encrypted bytes: bytes1 and bytes2. Now we have to do bitwise XOR operation between these variables and return the obtained hash.
hash=bytearray(x ^ y for x, y in zip(bytes1, bytes2))
return hash

CLASSES FOR DATATYPES
In the previous article we’ve learned about Int and String data types of MySQL Client / Server protocol. Now we need some classes to be able to read fields from received packets.
INT CLASS

Int class implements INT data type of MySQL Client / Server protocol. It accepts package parameter on initialization. Parameter package should be the instance of any package class inherited from MYSQL_PACKAGE class. Method next detects the type of integer (int<fix> or int<lenenc> (see previous article) and calls the next method of package object to read the byte portion of received response.
STR CLASS
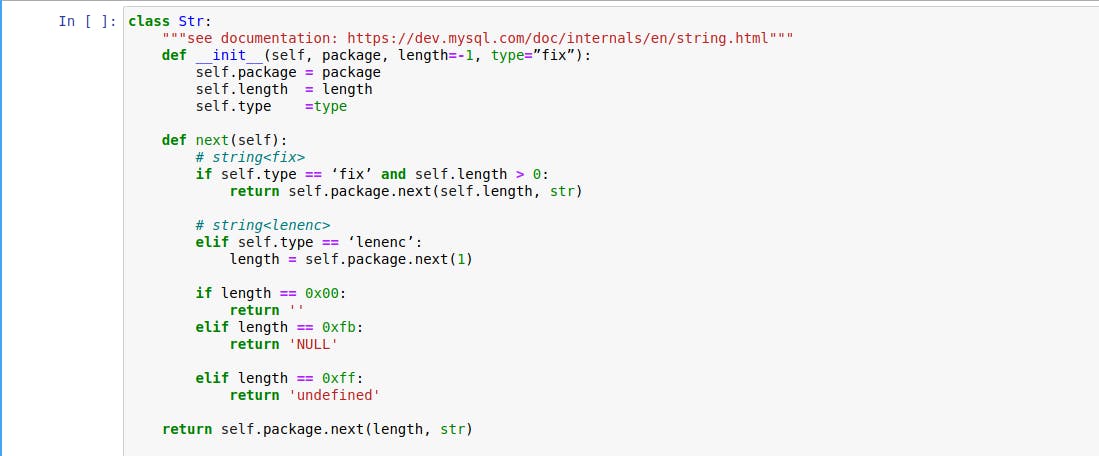

Str class implements STRING data type of MySQL Client / Server protocol. It accepts package parameter on initialization. Parameter package should be the instance of any package class inherited from MYSQL_PACKAGE class. Method next detects the type of String (String<fix>, String<Var>, String<NULL>, String<EOF> or String<lenenc>. See previous article) and calls the next method of package object to read the byte portion of received response.
HANDSHAKE_PACKAGE CLASS
HANDSHAKE_PACKAGE class is used for parsing the Greeting Packet received from server. It is inherited from MYSQL_PACKAGE class and accepts resp parameter on initialization. Parameter resp is the Greeting Packet response in bytes type recieved from the server.
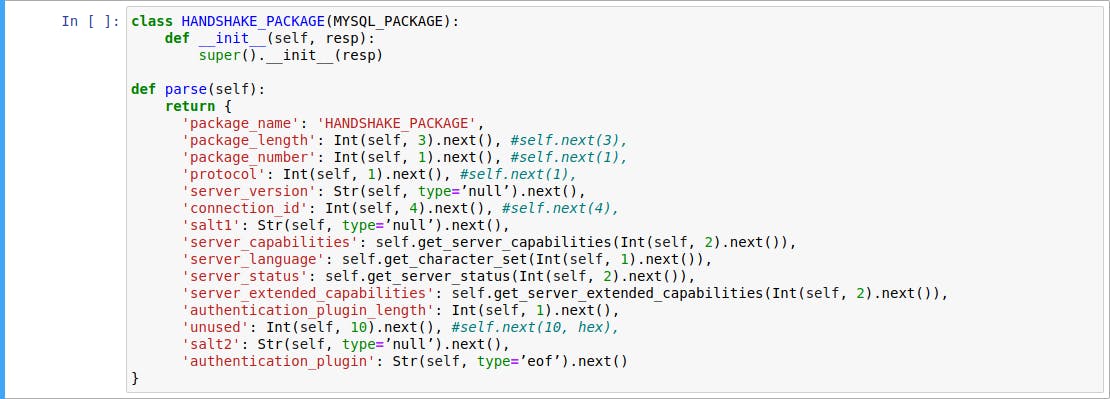
Method parse reading fields from the response using Int and Str classes and puts them into a dictionary and returns.
LOGIN_PACKAGE CLASS
This class is used for create Login Request packet.

OK package and ERR package are the response package of server after authentication or after sending query to server on command phase.
OK package and ERR package are the response package of server after authentication or after sending query to server on command phase.


MYSQL CLASS
MYSQL class is the wrapper class which creates TCP connection with server, sends and receives packages from server using above classes.
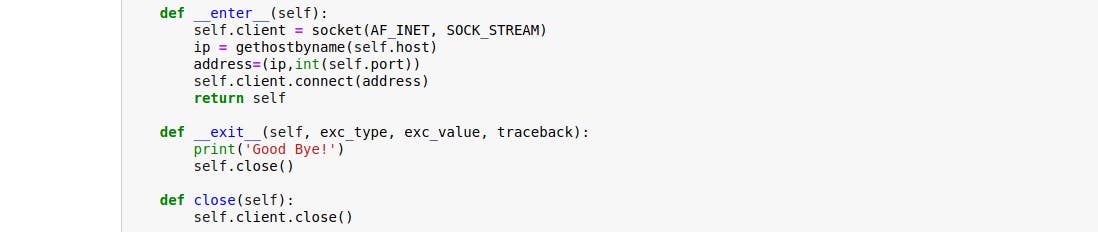

I think everything is clear in this class. I’ve defined __enter__ and __exit__ to be able to use this class with “with” statement to automatically close TCP connection. In __enter__ method i’m creating TCP connection over socket. And in __exit__ method i’m closing created connection. This class accepts host, port, user and password parameters on initialization.
In the connect method we receive greeting packet from server:
resp = self.client.recv(65536)
return HANDSHAKE_PACKAGE(resp)
In the login method we create Login request package using LOGIN_PACKAGE and HANDSHAKE_PACKAGE classes and sends to the server and gets OK or ERR packages.
That’s all. We’ve implemented the connection phase. To avoid making this article too long I will not explain the command phase. Because the command phase is easier than the connection phase. You can research it yourself with the knowledge you’ve accumulated from this and previous articles.
Demo Video:
If you’re a brilliant developer looking for remote software jobs, Turing may be able to help you very quickly. Head over to the Jobs page to know more!
Join a network of the world's best developers and get long-term remote software jobs with better compensation and career growth.
Elshad Agayev


Want to accelerate your business with AI?
Talk to one of our solutions architects and start innovating with AI-powered talent.