Complete Tutorial: Download and Install Ruby Gems From Gemfile
•6 min read
- Languages, frameworks, tools, and trends

Ruby on Rails is a famous framework that is used to develop web applications given to its intuitive syntax. Several well-known and high-traffic websites like Twitter, Shopify, and online news sites employ this popular web framework. It includes packages, which we refer to as gems or Ruby gems, that can be used and shared among developers easily. If you’re a developer curious to know how to download and install Ruby gems from Gemfile, this article will be of help as it discusses the process step-by-step.
What do Ruby gems do?
It can be said that Ruby gems resemble libraries in other languages. They allow developers to reuse codes from another project for a feature they want to have in any other app.
Ruby gems allow you to:
- Build a web application.
- Work with external services, such as APIs, with ease.
- Add a login feature to a Ruby on Rails application.
The format and file structure make Ruby easy to understand. It also has a very different workflow.
List of Ruby gems
1. Asset pipeline
This is a plug-in for the Rails app. It manages assets like CSS, JavaScript, and images. It ensures that it copies all these assets as required when you run rake assets:precompile or deploy your application. Many popular websites like Google Analytics and Gmail use the asset pipeline.
2. Ransack
This is the best alternative to a full-text search library for Rails. It enables you to add custom logic for ranking and filtering. It also allows you to add additional functionality with just a few lines of code, such as pagination. You can expect sane default results.
3. Factory girl
This gem provides a factory object that makes writing factories a cakewalk. It comes in very useful when you want to use factories to generate test data. As it is based on ActiveRecord, it lets you define factories and Ruby instead of SQL queries or other custom languages.
4. Devise
Devise is a flexible authentication solution for Rails that is used by popular web apps like Groupon, Facebook, NumLooker, and others. It provides an array of out-of-the-box features. It’s small, easy to set up, and is useful when you need to implement authentication logic in Ruby.
Which Ruby version should you choose?
We now move on to the various versions of Ruby to help you make the right decision about Ruby gems installation.
To specify the version number on the command live, use the e -v flag:
You will come across several options while specifying version numbers in a Gemfile.
- When no version number is specified, such as (gem 'gemname'), it will install the latest version that runs well with other gems in the Gemfile.
- If the exact version number is specified, such as (gem 'gemname', '3.14'), it will install the same. However, the installation will fail if it is incompatible with the other gems in the Gemfile.
- The optimistic minimum version number, say (gem 'gemname', '>=3.14'), will install the latest version that is compatible with the other gems in the Gemfile. The installation will fail if no version greater than or equal to 3.14 is compatible with the gem list in the Gemfile.
- The pessimistic minimum version number, say (gem 'gemname', '~>3.14'), is a functionality equivalent to gem 'gemname', '>=3.14', '<4'. It means that the number is permitted to increase only after the final number.
Best practice to follow
You may want to use a Ruby version management library like rvm or rbenv. They will help you install different versions of Ruby runtimes and gems. This comes in handy when you work on a project as most projects are coded against a known Ruby version.
Downloading Ruby gems from Gemfile
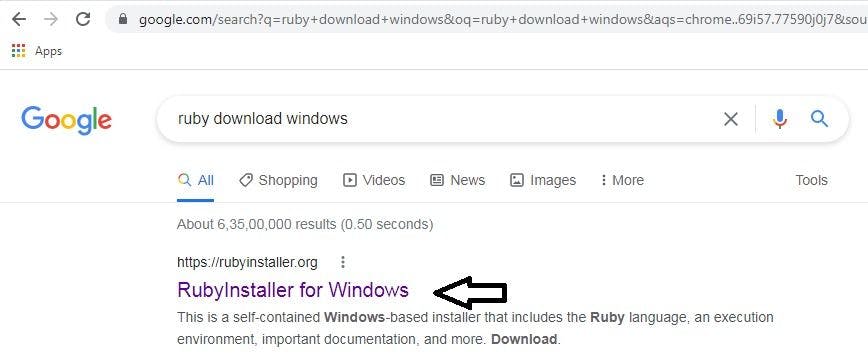
STEP 1: Start by searching for Ruby download in your browser.

STEP 2: Click on the rubyinstaller for windows (Ruby installer) as shown in the picture.

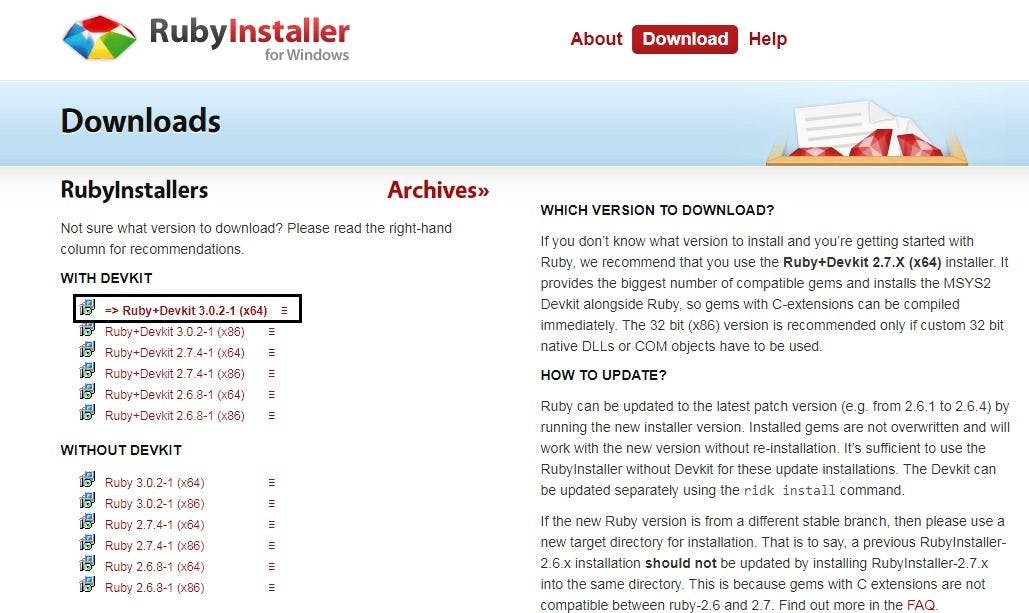
STEP 3: Click on the download button and let the process start.

STEP 4: Download a suitable version according to your operating system from the window that appears.

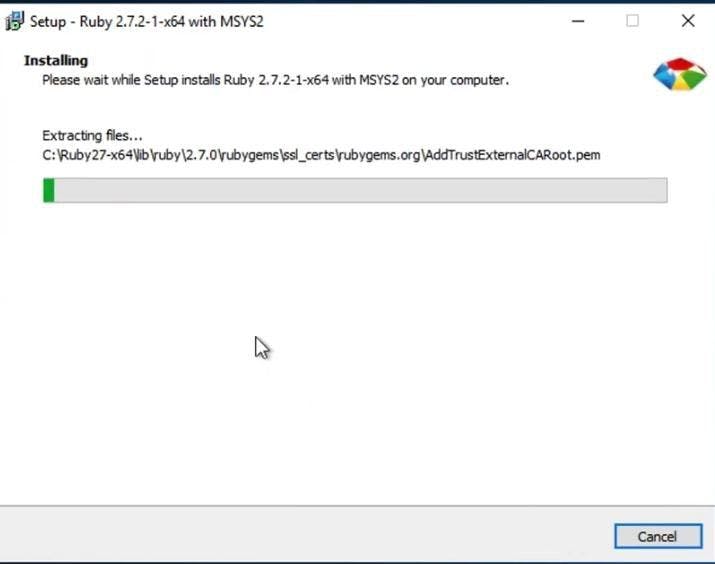
STEP 5: Click on the downloaded file, accept the license, click next, and let it install.

Installing Ruby gems from Gemfile
If you are not using Ruby < 1.9, install Ruby gems manually as it will not be included natively.
STEP 1: Enter the command below to install a Ruby gem.
If you are working on a project that includes dependency on a list of gems, they will be listed in a file named “Gemfile”.
STEP 2: If you want to install a new gem in your project, add the given line of code in the Gemfile.
Note: Bundler gem utilizes Gemfile to install dependencies required in a project. You will have to install Bundler first.
Here’s how.
STEP 3: Save the file and run the following command.
What to do if a Ruby application won’t start
If your Ruby application won’t start, it’s likely because of a missing gem. To rectify it, proceed with the Ruby gems installation locally using Bundler.
Bundler is a gem that manages dependencies. It offers an appropriate environment for Ruby projects. It tracks and installs the exact gems and versions that a project requires. By eliminating dependencies, it ensures that the gems you need are available in the development, staging, and production phases.
Here’s how you can set up and use Bundler for your RubyGem application.
Note: These steps are to be followed only after you have set up Ruby on Rails.
STEP 1: Run the following command on a terminal window.
STEP 2: Search and navigate to your project’s root directory.
STEP 3: Specify the dependencies in a Gemfile like below.
STEP 4: Install the required gems from the specified sources with the following command.
Note: The second command adds the Gemfile.lock and Gemfile to your repository. With this, all developers working on your app can use the same third-party code.
Load a bundled environment inside your app with the following code.
Note: This step is necessary only if you are not running RVM.
STEP 6: Run an executable that comes along with a gem in your bundle by using the following command.
Note: If the executable is installed in your system, running it without the “bundle exec” command may work. However, though it won’t pull in any gems that conflict with your bundle, it’s unreliable and not recommended. It may look like it works for now, but it may not in the future or on any other machine.
STEP 7: You can also create a shortcut to gems in your bundle with the following command.
Additional info to get you started
How to create Ruby gems?
Bundle is an easy way to create new Ruby gems. You can create a new gem with README, .gemspec, Rakefile, directory structure, and others to test, describe, and publish gems.
Here’s the code for the same.
Follow the step-by-step process to download and install gems with the help of this easy-to-follow Ruby gems tutorial. The additional information provided will also speed up your workflow.
FAQs
1. How do I set gem version in Gemfile?
Go to rubygems.org and search for specific versions of your gem. Use version operator: gem "name-of-gem", ">1.0".
2. How do I know if a ruby gem is installed?
Use gem list to get details about whether your Ruby gem is installed in the correct version.
3. Where do RubyGems get installed?
Ruby gems are installed in a directory inside the home directory.
4. How do I install gem packages?
Step 1: Install Ruby.
Step 2: Install Gems.
Step 3: Use the gem system to install Rails.
Step 4: Install Sqlite3.