Complete Guide to Python Django Framework
•23 min read
- Languages, frameworks, tools, and trends

Python is known for its easy syntax, consistency, and vast ecosystem of third-party packages. One of the most common uses of any language these days is developing high-end web apps using it.
Today we will discuss one of the most popular web development frameworks, Python Django framework, which is being used by some of the most popular companies. Companies that are hiring for a stack can also indicate its popularity. Having a decent knowledge of this framework will help you land on a lot of client-side projects in your freelancing journey.
What is Django framework?
Django is a high-level web development framework that uses the Model-View-Controller (MVC) design pattern of web technology and provides both frontend and backend design capabilities in one place. It follows Python's batteries-included approach to ship common web implementations and the "don't repeat yourself" pattern, making developing basic web applications fast and secure.
The database technology that Django supports is SQL Stack, but you can also use MongoDB with it. However, the team doesn’t provide official support for this, but you can use MongoDB or other no-SQL databases as well.
How to install Django
Make sure you have the Python 3.x version installed. In this tutorial, we'll be using the Linux operating system, but that's the beauty of Python: almost everything will be the same in MacOS or Windows OS.
Create the virtual environment using the virtualenv tool in the venv directory. Activate the newly created environment. This will update the PATH environment variable, and the local Python interpreter will be used instead of your current terminal session.
This will install a django-admin tool which can be used to scaffold the Django project. If the above commands run successfully, then the following command should print the version of the Django framework installed.

Getting started with Django
To begin with the project, you need to use the startproject followed by the name of the project. This will create the directory with the name of the project in the current directory as shown below.

Rules of Naming Projects
- Avoid naming projects after built-in Python or Django components. For example django or test
- Project name should be a valid Python module name, otherwise, you will get the “invalid project name error” as shown below.

Django’s file structure
Before moving further, let me discuss the basic directory structure of a typical Django project.
You will find that there is another directory with the same name as the project. This contains the configuration of the entire project. The manage.py file is what you will be using most of the time to interact with the project.
You must be thinking, what is the difference between django-admin and "manage.py" if they both have the same set of commands? The django-admin tool is an overall administrative tool that you will be using most of the time while starting a new project in Django. To make the changes specific to the current project it is required to have DJANGO_SETTINGS_MODULE environment variable set, which is done by default in the "manage.py" for you.

HelloWorld/settings.py is the main configuration file that we will be using to customize the application behavior and register more apps.
HelloWorld/urls.py contains the configurations of the URL map which will be used by Django’s URL dispatcher service to match the request path from the HTTP request and load appropriate views for processing the request further. You will be using this file regularly while adding more endpoints to the application.
ASGI and WSGI are the web gate interfaces used to serve Django applications using production-ready web servers like NGINX or Apache. We will be showing you how to do this in the end.
Django’s development server
Django comes with a development server with a hot reload feature that reloads whenever you make any changes to the configuration or your application logic. Use the manage.py runserver command to run this server.
Ignore the database migration warnings, we will be discussing using databases shortly.

You can now access the web server at "http://127.0.0.1:8000" on your favorite web browser.

In some cases, another service may be running on the default port of Django's development server. In that case, "manage.py" will fail with the message "Error: That port is already in use," and you can specify a custom port on which to run the server.

You can now access the web server on a different port as shown below:

Creating Django apps
It's time to begin developing applications using apps now that our project is set up and functioning properly. Cohesive logic are implemented using Django apps as modules. What does it now mean? Cohesion in software development refers to the practice of implementing only a specific set of characteristics in the piece of code that corresponds to its name.
Here's an illustration: Consider writing the concat_string function to join two strings together. Now, this function should accept two strings as an input plus a delimiter parameter (if necessary), returning the concatenated text without performing any additional operations like altering the string's case or saving it to a database (if required).
You can scaffold the application in the current project, as shown below.

Defining views and URLs
A view is something that is used to implement the business logic and return a valid response to the user. As an introduction let’s define a view function index, to accept names from the query parameter and return a greeting message.
Open task/views.py file in the editor, and type the following text in it.
This is a simple code that accepts a string from the URL search parameter “name” and uses “Guest” if it is missing. This is cool, but which URL will you use to load this page? This is where "urls.py" configuration comes in handy. It takes the path pattern and view function reference to process the request.
Open the MyTodo/urls.py file, import the views file from the task app, and create its entry in the urlpatterns. This is the special variable used by the Django dispatcher function to iterate through all the URL patterns.
Let’s try to print the greeting message using “Gurkirat Singh” name in the browser.

If we remove the name parameter from the URL, it will use the default value “Guest”, as shown below.

But, there is a minor bug when you include the parameter and do not provide any value to it, the message will not look like the expected result. It will show you “Hello, ! I am a django application.”. This is because the default value is only used when the parameter does not exist in the query parameter dictionary.
Let’s update the logic to ensure that the string is non-empty and there are no trailing white spaces.

Great, it worked! It is recommended to configure all the views and other application-related configurations in the module itself and later reference it to the other modules. So create a "urls.py" file in the task directory.
Basic template rendering
In MVC pattern, you might have heard a lot about templates and templating engines. Simply put, it is used to set a blueprint of the response, text, or html content, which is then populated with the dynamic content based on the current user’s scope and then returned by the view. This process of building the content from the blueprint and the data (known as context) is known as template rendering.
A templating engine, on other hand, is used to provide the service of taking the input template and the context (as a dictionary) and returning the rendered string or the response object, which then can be returned from the view function.
Django ships built-in backends for its own template system, creatively called the Django template language (DTL), inspired by the Jinja2 which is created by the same team that developed and maintains Flask (another web framework in Python). The support for DTL lives in the django.template namespace.
Let’s change the above function to render and return the template instead of HttpResponse directly.
Create a file in the task app directory, with a relative path set to templates/index.html and with the following content.
Update the view function to take the name from the query parameter and render the template.
In the "settings.py", add the name of the task, which is by default the name of the folder.
The reason for adding the application here in the installed apps is that now Django will recognize it as the special directory. In this scenario, it will add the “<app>/templates” directory on the top of the template name search order.


Using database and migrations
In web applications, a database also plays an important role to persist lightweight data like user information and activities. We will now cover databases and migrations in this section and show how to create the model.
Nowadays to ease the development process ORMs are being developed and used widely. The role of the ORM in any language is to provide an interface that converts the language-specific code to SQL and vice versa where required. For example, you can define the tables when you are creating a class in Python, this is called Model, and then we can create an object for the model which will create the row in the database and return a class object in the language.
When you first use ORM, you will be astounded by how simple it is to work with SQL queries at scale. The ORM provider handles all of the complex inserts, joins in selects, and aggregates. And all you need to know is the appropriate function and model name.
While working on the application, the schema of the models changes and all rows in SQL-based databases must adhere to that schema. As a result, migrations are used to track and apply changes to the table name or columns. Applying migrations to the database will result in ALTER TABLE queries being executed on the table.
Apply the migrations using the ./manage migrate command to create the required tables

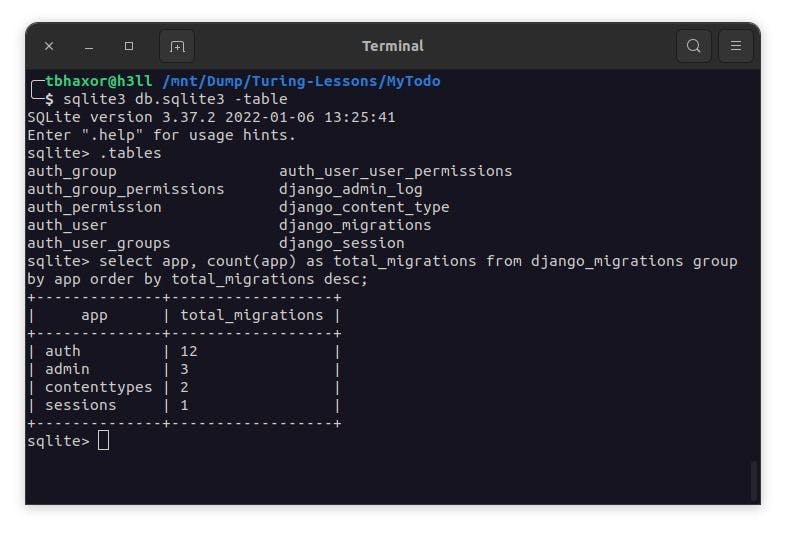
After running this command, you will see that the db.sqlite3 file will be created in the current directory.

After opening the database file using the sqlite3 tool, you can see tables created with the format “<app_name>_<model_name>”, and an additional table django_migrations is also present which will track all the migrations.
Migrations will make irreversible changes in the database, therefore, it is always recommended to dry-run the migration before actually applying it.

SQLite is used by default in the configuration. If you're new to databases or simply want to try Django, this is the best option. However, when you begin with your first real project, you may want to use a more scalable database, such as PostgreSQL. In this tutorial, we'll be using an SQLite database.
Create task model and apply changes
Let’s create the task model with name, description, created_at, and updated_at fields. Where both the name and description fields will be of VARCHAR type, but the name would be the required field and the description will be NULLABLE.
Write the following model configuration in the task/models.py and check for migrations.
For every new change you make in the model, it is required to make the migration files using ./manage.py makemigrations.

Apply the migrations using ./manage.py migrate, this will make changes in the database and create entries in the django_migrations table as well.

All the migrations are created in the migrations package inside the app directory. You will see the Migration class which is inheriting the django.db.migrations.Migration class.
Note: If the initial in the migration is set to True, then it will use CREATE TABLE query, otherwise ALTER TABLE query.
HTML forms using Python class
Forms are frequently used in web applications to collect user input, process data, and store it in a database. You can write the HTML form directly in the template, but let’s see how it can be created from Python as we create DB tables. You will not write the HTML code, but rely on this, it is yet another powerful feature from the Django team.
Django’s form functionality when combined with the templating engine can simplify and automate some tedious tasks like creating forms, accepting, and sanitizing input. There is also built-in support for validating CSRF tokens and preventing attacks for forging unauthorized requests. You will see all these in action in the following subtopics.
Create basic form
For demonstration, let’s update the greeting endpoint and accept the name using a POST request. Create a file named "forms.py" in the task app directory and copy the following content into it.
This will create a name field in the form. If the help_text is provided it will be shown in the form near that input field, otherwise it will be omitted.
Create a new template with file name form.html in the template directory with following content. This is used to render the form with input fields, csrf_token as hidden input and submit button.
Replace the logic in the view to render form in the template when GET request is made and initialize the form with POST data and return greet template.
On the web browser, reload the page and remove the name query parameter from the URL. You will see the rendered form.
Ignore the styles. You can implement that as usual, we will be discussing the Django core features.
View page source option in the browser shows that it is using the HTML tags and input tag attribute to customise the form elements and client side validation.

Now, you must be thinking that it can be easily bypassed. Well that is not the case, after binding the input, Django will run validation on the backend as well.


Create forms from model
If you have created a model, no need to create additional logic for the Django’s ModelForm class, which can be used to generate the form from the fields defined on the model and it is intelligent enough to inherit the validations from the model. For example, if the max_length of the model field is 100, the input tag will have a maxlength attribute set to 100 in this case.
Generally, the type converting from model to form is axiomatic, but if you want to know more in detail, we would recommend checking the official documentation
So we have created a model already in the previous objective, let’s use it to create a form. We will be naming it as CreateTaskForm.
In the task/forms.py import new dependencies will be as listed below and create the form as shown below.
Import this form in the task/views.py file and create a function to handle the request. It will return the rendered form on request and for POST request it will process the input and redirect the user to the tasks page.
Grouping the URLMaps
So the views are gradually increasing and in the large application it is usually recommended to have the local "urls.py" file and then register in the global URL map. Before it gets more complex, let’s create task/urls.py and add the URL to view mapping there.
It is often hard to remember the exact url path while developing, but easy to remember the names as they are more human readable. Django realised this and provided a feature to alias the urls with names. Namespace is used to group the similar names and you can have “[namespace]:[route_name]”.
In the above code snippet, app_name is used to provide the namespace for the url and name argument is used to provide the unique human-readable name to the route in that namespace.
For example, if you import the admin urls, there is now way to provide namespace like we have added in this case. So you can pass the tuple to the include function, where the first argument is the referent to the URLMap and second argument is the value of the app name. The function destructures the tuple and assigns the values accordingly.
Register this URLMap in the root URLMap as shown below, replacing the greet route.
This will automatically prefix all the routes with “tasks/” and now you will have two routes under the task module: “tasks/” and “tasks/new”.
Create the templates in the “task/templates/list_tasks.html” and “task/templates/create_task.html” with the following contents respectively.

Look how the URL name “task:new” is reversed to “/tasks/new” in the HTML response. Isn’t that magic? No it isn’t, the logic of reverse lookup urls is implemented here in the Django URL helpers.

Now click on the “Create Task” link and it will redirect to the form page. How cool is it? With a few lines of code we have implemented a basic form page.

Let me add some details in the form and submit it. This will validate the form, save the instance in the database and redirect back to the /tasks page.


It is coming from any cache, but actually saved in the database. Here is the proof of the SQL query from the sqlite3 execute on the db.sqlite3 file.

Initializing model form from database entry
You can use the same model form to initialize it with the data from the database and update the entries. To make the form class generic, let’s rename it to the TaskForm in the “task/forms.py” and “task/views.py” files.
Create another view function in the "views.py" to accept the “task_id” and find the object matching the primary key. The function sets the model object to the form instance property to populate defaults.
Add a new column in the “list_tasks.html” template to show Edit options beside each task. This will be an anchor tag which will redirect to edit task form.
If you have noticed, the url helper is now accepting the task_id parameter, this is defined in the URLMap configuration file “task/url.py” as shown below.
Next, create the “edit_task.html” form and render the edit page form.
Notice that in this case we have omitted the action attribute in the form. By default submit action will use the current page url, check this

On clicking the Edit link, it is redirected to the “/tasks/1/edit” page. You can see the data is already populated in the input fields ready to update.

If you change the task description or name and then click the "Edit Task" button, the form will recognise that the instance has already been created and will update the entry rather than creating a new one. The value of the instance's pk field is used to check it. If the value is None, a new row will be created; otherwise, the row with that id will be updated, implemented here in ModelForm class.
Note: You do not have to explicitly call the form.instance.save() method, it can be simplified to “form.save()”, that's all.


The change is immediately reflected in the database. You can run the same select query to confirm this.

Generic and class-based views
It is now time we move on to a more advanced topic. The capability of having generic views along with ease of modification is fascinating about choosing Django as a high level frontend framework for web framework.
So far, the view functions that are callable and take at least HttpRequest as the first argument and other arguments if provided in the path, render the template, and return response. However, they, like forms, can become generic, and you can write fewer lines of code to implement the same view functions.
The generic views are inherited from the base View class; using this is optional unless you plan to reimplement the view function logic. We can assure that it is easily configurable.
Base views
When you have a template and some contextual data it is preferred to use the TemplateView class and if you want a client to redirect a different url, RedirectView class is used. This looks obvious but why should you use this instead of the callable function, well the answer is pretty straightforward, consistency!! A good developer makes the codebase more consistent than adding cool and efficient features to it.
It is up to you to use these. However, if you choose not to use them, feel free to use the callables that we have already shown.
Let’s rewrite the “list all tasks” using TemplateView class which inherits most of the functionality from TemplateResponseMixin source and ContextMixin. If you don’t know what a mixin is, we will discuss it in details while discussing authentication flow. To demonstrate the use of RedirectView, we will create another URL config with /tasks/all to redirect to the /tasks.
Replace the “list_tasks” view function with the following code in the "views.py" file.
The template_name field is used to provide the relative name of the template file and get_context_data() method is used to return a dictionary representing the template context.
The url field can accept the “reverse_lazy” function output or the URL (absolute or relative) appended to the Location header in the response, and the permanent field specifies whether the redirection is permanent (i.e. HTTP 301) or not.
To register the class-based views with a URL, use as_view() that returns a function which can be called by the Django URL resolver and respond with the appropriate view. Import the classes in the "urls.py" file and make the changes as shown below.
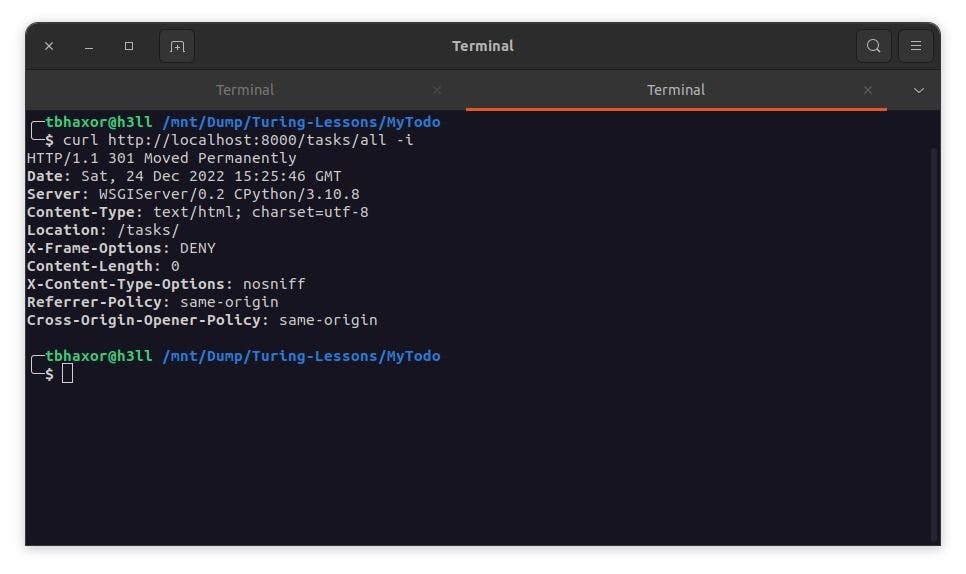
When you restart the server, the task:list-all view should function normally, but calling “/tasks/all” should redirect to the “/tasks/” page.

As this redirection is quick, let’s show you the response via terminal. As you can see, the Location header has “/tasks/” URL with HTTP status 301 with description “Moved Permanently”.
Generic display views
In general, there are two types of GET views, which we will discuss in this topic. The list view is used to retrieve a collection of objects of similar types from the model, whereas the detail view is used to retrieve a single object based on the primary key.
Let’s replace the “AllTasksView” class with “ListAllTasksView” and add a new class with name “TaskDetailsView” which will inherit from ListView and DetailView classes respectively. Both of these classes will have one thing in common, reference to the target model and template_name.
The “model” field here is inherited from MultipleObjectMixin.
This will not render the tasks directly, you need to do one minor fix in the “list_tasks.html” template file to make it work. Replace the tasks with object_list, because it exposes a generic variable in the template context and adds a URL reference to the details page.
Create another view class after the above class with the following contents.
The “model” field here is inherited from SingleObjectMixin and pk_url_kwarg is used to define the field to match the primary key in the target model in the request arguments (path parameters).
Create a template file “task_details.html” in the tasks/templates directory with the following contents to serve the rendering input.
Import the classes in the “urls.py” file and make the following changes.
Reload the browser page and goto /tasks/ page if not already there, you will see that details link is visible and on hovering, it will display the URL to /tasks/1/ object.

After clicking the link, the details page loads, displaying all the details of the task object with its associated primary key.

If the primary key is not found, it will show the error which in the debug mode would look like the following.

This behaviour can be changed by overriding the “get()” method which is used to get the object and render the template. Make the following changes in the “TaskDetailsView” class, this will redirect to “/tasks/” URL if the original implementation raises Http404 exception.
As this redirection will be quick, let’s show you the response via terminal.

Generic edit views
There are 3 types of generic edit views:
- Create view is used to take the model, render a form on the template with all the possible fields using ModelForm and then create a new object for the model.
- Update view will take the value of the primary key or slug in addition to all the fields from the create view and update the object matching that primary key.
- Delete view will take similar parameters like update view, but it will delete the object from the database.
All these three types of views inherit another type of edit view, FormView. This is used to create the form and handle user input submission. If the form is valid, it will write the changes to the database, otherwise re-render the same template with error messages.
Let’s rewrite the task model CRUD with generic edit views. For the readability, we would recommend importing all the view classes directly from the “generic” package.
Replace the “create_task” view function with the CreateTaskView class which will inherit from the CreateView. This will take the form_class (coming from the FormView) that we have already defined in the “forms.py” file. By default the form class will be created from the model, but in this case we already have a ModelForm, and intend to use the same. Doing this will give us more control over form handling and make it easy for other developers to read.
The success_url here will be used to redirect to the target url when the form is valid and successfully saved. If you want more control over the value of this option, we recommend that you overriding the get_success_url() method in the class.
Go to the "urls.py" and replace the create_task with the newly created form.
Go back to the "views.py" file and replace the edit_task function with the EditTaskView class which inherits from the UpdateView class.
Make the necessary changes in "urls.py" to support the class as view and deprecate the previous one.
Let’s create the DeleteTaskView class from the DeleteView right away before getting into the demonstration part. In the web application, deleted operations are typically regarded as irreversible, so the user must typically be presented with a confirmation form. If this view is retrieved using GET, it will display a confirmation page with a form that POSTs to the same URL.
Create a template with name delete_task.html in the task/templates directory and paste the following contents into it.
Now, add this class to the "urls.py" file after edit view configuration (you can do this anywhere, but we recommend following a systematic pattern like this).
Go to the task_details.html template and add a hyperlink reference to this page. It would be easier to show this in a short movie, as screenshots will not work at this level.
Isn't it interesting how these classes and methods have incorporated nearly all of the logic that we manually utilized in the function-based views, resulting in a much shorter "views.py" file? Additionally, the power is in our hands because we always have the option of overriding a function's original implementation in the code based on our own unique business logic and displaying just tasks connected to the user. Let’s discuss this in our next topic..
There are a lot more types of the views that Django currently supports, writing about each of them would not be possible in this post. We would recommend that you to read some of them on your own – here.
Authentication and user login
In a web application, it will always be a basic requirement to support user account management and associating the resources with the current user. Django solves this by providing a built-in authentication framework that handles both session and cookie based authentication and authorization.
The difference between authentication and authorization might sound confusing. However, there is a clear difference between the two terms: whereas authorization determines whether a certain action is permitted for the current user or not, authentication entails proving your identity.
As a framework it provides you with additional features such as
- Password strength checking and configurable hashing system (default is PBKDF2)
- Throttling of login attempts
- Easy OAuth implementation
- Forms and view tools for logging in users, or restricting users
- A pluggable backend system to re-configure the logic of authentication and validations
The best part is that you don't need to set it up by yourself. This was automatically made available in the 'django.contrib.auth' namespace when you first scaffolded it.
Associate user with task model
Let’s update our task model and add the user field as Foreign Key reference to the User model from the “django.contrib.auth.models” package. Update the following changes in the task/models.py file.
The above code means, many tasks belong to one user, and it should delete the Task object if the User is deleted. Initially, such a kind of reference can be confusing but you can use a basic framework to decide how to go with it. Luckily you will also get access to this.
When starting with relations, first of all ask the following questions to yourself:
- Which model belongs to what model?
- Do we need to have multiple objects of the belonging model to be associated with one object of another model? [Yes/No]
If let’s say the answer to the first question is B should belong to A, then in this case A is called parent and B is called child. And in the database rule it is always recommended to store foreign keys in the child model. In this case, the Task model belongs to the User model, that is why we have created a ForeignKey reference in this model instead of User model.
If the second question has a "Yes" response, it means that the parent object can have multiple children. You need to use the ForeignKey reference, like we have used in this case. If the response is No, however, you must create a One-To-One relationship by making the foreign key unique. OneToOneField makes it simple to implement in the case of Django.
Let’s commit these changes to the database using “./manage.py migrate” command as shown below:

Now you can see that the user_id field is created in the “task_task” table.

Authentication forms
Currently the tasks are not associated with the user, therefore we need to implement authentication forms and then adapt the logic in the “task/views.py” file.
We will implement all the authentication logic in the accounts app, so let’s create it using the “./manage.py startapp” command.
Add the following login template in the “accounts/templates/registration/login.html” file
Now create a signup form and save as “accounts/templates/registration/signup.html” file with the following contents.
Create the view SignupView in the “accounts/views.py” file to access email, username, and password to create the user account. On success, it will redirect to the login page.
Update the “accounts/urls.py” to include all the urls from the auth module along with their views.
Import this URLMap in the main configuration file at “MyTodo/urls.py” and redirect the “/” url to the tasks:list-all page. This will remove an absurd 404 error message whenever we open the "http://localhost:8000" page.
In the “MyTodo/settings.py” file, add the following configuration for the login and logout redirect page. The LOGIN_REDIRECT_URL is used to define the redirect URL (or name) on successful authentication and LOGOUT_REDIRECT_URL is used to define the redirect URL (or name) on successful logout.
Update the “task/views.py” file to make all the views Login Required and get all the tasks associated with the current logged in user.
After you have done all these changes, you can expect the same result as shown in the following video
If you want the entire codebase for reference, we would recommend you to star and fork this git repository
Author
Gurkirat Singh
Gurkirat Singh is a polyglot developer who solves real-world problems and builds web applications for end-users to utilize his solutions. He has been in development for a long time and has almost learned everything from the open-source community. Now it is time for him to contribute back what he has learned and how he has learned through blog posts and walkthroughs.