How to Implement User Authentication in a REST API Using Laravel Passport?
•5 min read
- Languages, frameworks, tools, and trends

Laravel Passport is an Open Authorization 2.0 server implementation used for authenticating APIs using Laravel. As the tokens are only used in API authentication, Laravel Passport offers an easy way to implement the token authentication on the OAuth server. In Laravel, you can take the holistic approach to build custom APIs. You do not need to put in tons of effort and can easily give preference to security. Laravel Passport streamlines the security and allows you to create Auth Tokens to provide authentication to the users.
Many digital systems today require user authentications to access resources. In this article, we will shed light on the Laravel Passport package to authenticate application APIs. Apart from discussing this in detail, we will also talk about how to create and validate the tokens.
First, let’s discuss API.
What is an API?
API stands for Application Programming Interface. An API is a set of protocols, tools, and routines that are used to create software applications. It acts like a bridge that connects the gaps between different software components.
In software development, an API is a resource locator that handles and manages the data for the web application through HTTP Requests GET, DELETE, UPDATE and POST functions. It also manages the CRUD processes and operations.
What is REST API?
Representational State Transfer or REST is a software development approach that defines a set of limitations. It is used to create web services and solutions. Web solutions that comply with the REST architecture are called RESTful Web services. These services allow the systems to streamline interoperability between different systems on the Internet.
RESTful solutions allow the systems to manipulate the textual representation of Web resources by using a predefined set of stateless operations.
Before we begin implementing user authentication using Laravel Passport, there are some prerequisites we need to follow. Let’s check out the requirements.
Starting a new Laravel project
Let’s begin the task by invoking the following command in the terminal. This will install a brand new Laravel application.
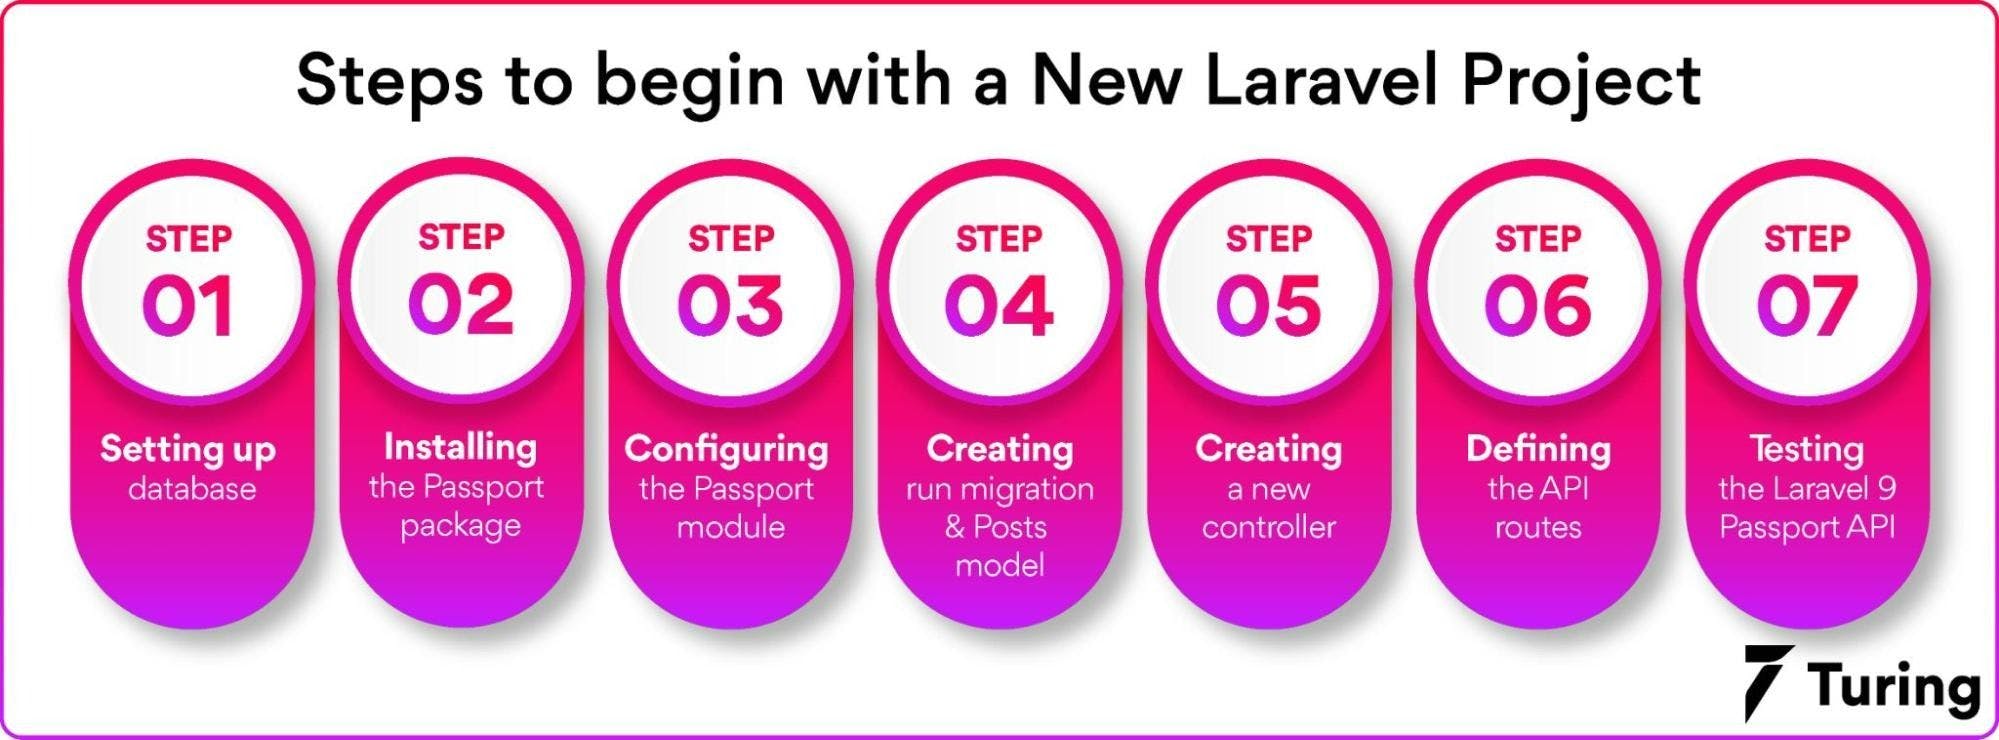
Setting up the database
To set up the database, you must install XAMPP on your local development system and turn on the local server.
Setting up the database deals with streamlining the consensus between the database and Laravel. Now, you need to import the following code in the ‘.env’ file. Doing this will establish the connection between the server and the client.
Installing the Passport package
This is the second step of starting a new Laravel project. It leads to the installation of the Passport package through the Composer package manager. Run the command in your terminal.
Configuring the Passport module
Next, we need to focus on the process to configure the Passport package in the Laravel application. Open the ‘open app/Models/User.php’ file and include the ‘HasApiTokens’ trait inside the user model. This is mentioned in the code below.
Next, open the ‘app/Providers/AuthServiceProvider.php’ file and register the registerPolicies() methodology inside the boot() function. This will fetch the required routes for your code.
Then you need to register the PassportServiceProvider class in the provider array in the ‘config/app.php’ file. The code will be as follows:
Now, you need to configure the driver for the Passport and get inside the ‘config/auth.php’ file. You also need to make a few changes as shown in the code below.
Creating run migration and Posts model
To establish an agreement between the client and the server, you need to create the Post model. You can do that by executing the code fragment mentioned below.
After this, you will be able to see the original pattern of the posts migration file in the table:
Here, you can add some values to create the internal connection using the model. Below is the code fragment.
Next, you need to create the ‘app/Models/Post.php’ file. You also need to register the following values inside the ‘$fillable’ array.
After running the above code fragment, you need to run the migration using the code fragment mentioned below.
Creating a new controller
Let’s take another example to execute another command. The code fragment below will create a new controller in the Laravel application to create a registration and login REST API.
A controller is a very important file in Laravel application development. Now, you need to insert the code fragment in the ‘PasspostAuthController.php’ file.
Before moving to the next step, you need to establish an agreement between the User and Post model. Eventually, you need to incorporate the following method inside ‘app/Models/User.php’ file.
After this, you need to create a Post controller.
You now have to insert the following code in the ‘PostController.php’ file.
Defining the API routes
It’s time to define the API routes. You need to go to ‘routes/api.php’ file to declare the code fragment below.
Testing the Laravel 9 Passport API
With this, we are at the end of building the REST API with Passport Authentication in Laravel. Last but not least, we have to test the API we created.
We can use the Postman application to test our newly created endpoints. Postman is an easy application for professional developers. After registration and login, we will receive the access token which streamlines secure authentication and authorization with the server. Finally, we need to set it as the Bearer token in the Authorization Header to proceed with the testing.
To start our new Laravel application, we can run the following command:
We discussed the Laravel Passport API and walked you through every process to build the REST API in Laravel. To recap, user authentication is the process to identify the user credentials and authenticate the user for secure web sessions.
FAQs
1. What is the use of authentication in Laravel?
User authentication is the process of identifying user credentials for social media accounts, emails, and more. In Web applications, this process is managed by multiple sessions that take different input parameters for user identification. The user is authenticated only if these parameters match. In short, the user must be authenticated before decrypting these parameters.
2. What is OAuth 2.0?
OAuth stands for ‘Open Authorization’ which is a standard that allows a Web application or a website to access the resources or user credentials on behalf of the user. It is the industry-standard protocol for user authentication that focuses mainly on the client while streamlining the flows for all the web applications.
3. What is a Laravel Passport?
Passport is an OAuth 2.0 server implementation for API authentication that works in the Laravel environment. The Laravel Passport package offers a secure way to implement token authentication on the server.
4. Is Laravel good for API?
Yes. Laravel works in tandem with API. There are multiple benefits of testing an API structure and analyzing the results while having complete control on the database.
5. Is encryption a form of authentication?
Digital signatures are special codes that are unique to each party. Encryption authentication prevents online attacks with these digital signatures.