Node.js Logging Guide
•6 min read
- Languages, frameworks, tools, and trends

Node.js is originally a server-side framework that has grown tremendously in popularity. It has seen a lot of improvements which have made it suitable for the development of desktop applications, mobile, and the internet of things (IoT). With Node.js, a complete full-stack web application can be written on the server using the same JavaScript language.
This article will guide you through the aspect of a log in Node.js. This lets you organize and keep track of the internal synchronous and asynchronous transportations or interactions in your code. Although not often considered during some of the software development processes, keeping track of logs is good practice in the software development life cycle. It helps maintain the code base and trace the root cause of issues, if any.
Node.js built-in libraries
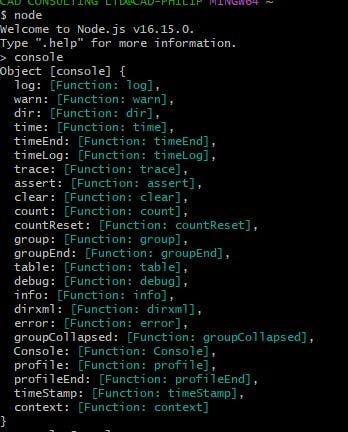
Node.js console logger is a built-in module that is designed to align with the object provided by web browsers apart from the commonly used console.log() method used at run time. There are other globally configured objects to write stdout(standard output) and stderr(standard Error).
The basic console.log() and console.info() have events log to the stdout while the console. warn() and console.error() log to stderr. The output is displayed on the inspection developer tools (frontend) or console and the integrated development environment (IDE) terminals when running the backend on the local server.
You can check the objects on your cmd/Git Bash with the following command prompts. In this article, Node.js 16.15 is used to display all the node consoles.
- Launch cmd or use the IDE terminal.
- Type “node” and hit Enter.
- Type “console” and hit Enter to display methods.
Node.js logging file
Having been introduced to log in Node.js standard output and standard error event logs, let’s learn to write events output and error to a file. This is another approach that is considered among the best practices.
Writing to a file involves the use of the Node.js console class. It enables events to be written to any Node.js stream. Here, let's consider the use of the “fs module” which is an inbuilt module of Node.js.
To log the stdout and stderr to file, you need to instantiate console objects from the console class. For example:
1. Create a new folder and a logger.js file on the editor. VS Code is used here.

2. Write this code snippet.
3. Run the code on your terminal if using a VS Code terminal. Type Node logger.js to run it.
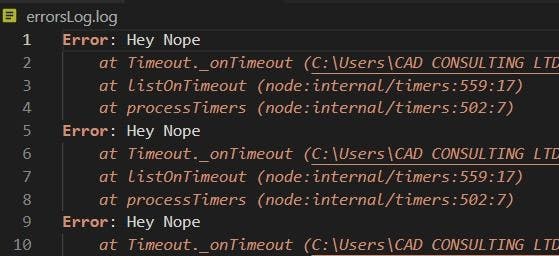
The errosLog.log and outputLog.log will be generated at the same time. Logs are written on both files every 10 seconds.


Log level support
The Node.js logger has almost the same concept but different levels of impact. You will come across most of the levels during your development process whether you use the built-in or Node.js logger libraries. This support level includes:
1. Log: The console.log() is also known as console.info(). The support level gives informational messages, highlighting the progress of the application such as application start and shutdown time on the log.
2. Error: Console. error() behaves like console.log() but writes to stderr instead of stdout. It logs errors that halt the operation of the server.
3. Warn: Console. warn behaves like console. error(). It indicates undesirable conditions during runtime.
4. Debug: It details information events that are most useful for debugging an application.
5. Trace: It records every detail about the application’s behavior during development.
Fs module
Node.js “fs module” is a built-in library that provides simple file system input/output functions to be used. We’ll have to use it to first demonstrate how to write console.log() and console. error() from a server running on the local machine before considering any other approach.
In this example, you’ll have a Db.js and app.js file on your running machine. The Db.js should connect to the database while the app.js should be listening to a Port.
In the root folder of your backend folder, create a util folder and then a Logger.js file. This should contain the following lines of code:
Before starting your server, make sure to import the console to the index.js file accordingly.
Run the app server.
Check for each new log generated on the util folder.

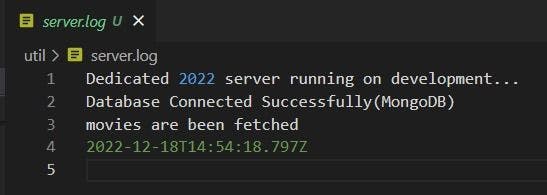
Once your application is running and Db has connected correctly, the information on the connection will be recorded on the server.log as displayed. Otherwise, it will be recorded on the error.log.

Passing logger to other JavaScript files
We’ve defined the logger which has been passed to the index.js file to log information on the server connection to the Db. However, the logger can be extended to other parts of the JavaScript files in the code.
The code will be extended to log messages when a call is made to a particular API endpoint. For instance, get the movie's endpoint.
To achieve this, simply import the same logger.js console to the function of the controller you would want to get. Example:

On Postman, send the endpoint to return all movies (use your endpoint for this demonstration). Once fetched, the following information should be logged on the server.log otherwise the logger will have to log into errors.log.
Node.js logging best practices
The Node.js logging libraries packages provide features to log in Node.js files to text format. They have different logs to meet organizational needs. Configuring log files for large applications enables quick access to analyze logs and control the log volume. For best practices, consider using other Node.js libraries to enhance the performance of the logger.
Using Node file logger framework
For easier implementation of logger into an application, we will use the Node file logger libraries instead of the built-in libraries as implemented earlier. They are good at structuring, formatting, and transmitting log information without additional overheads. The installation process is also simpler.
Guide
You have an existing JavaScript backend running on the local server with some logs returning at the terminal each time an application is started. In this case, it’s preferable to use a logger file to view each process information when the server is started and a POST or any call is made on the API controller.
Install the Package
npm install node-file-logger –save
On the existing backend root folder, create a util folder and a Logger.js file with the following code:
At this level, we log the information of the local server connection into the logs as follows:
Import the logger file to the serve.js file. Follow your code pattern. If you have console.log, change it to log.Info()).
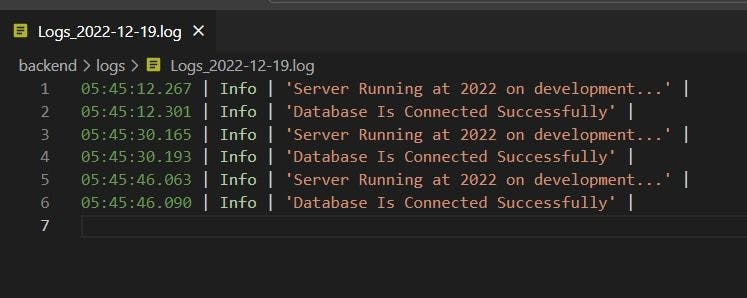
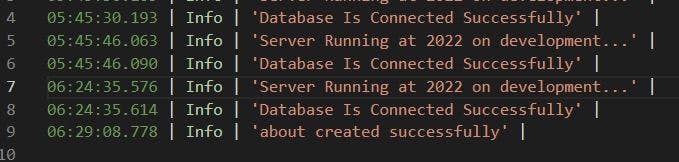
Run the application. At the root level of the backend folder, a log folder will be generated with information containing the timestamp log and the connection string message.
At the controller level, import the node-file-logger and add a log.Info() at the Post method instead of the commonly used console.log().
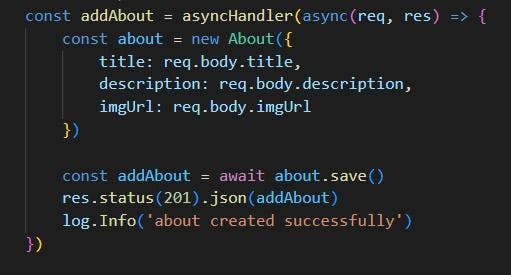
Make a POST call. Do this using Postman to test and send the POST. Once done, check the generated log file to observe the return response.
Observe how easy it is to use the node-file-logger libraries to log files.
Support log level
As you continue to use log files for your projects, it’s good practice to use proper log levels for efficient node file logging. Every log level indicates the message priority which is shown in integers of 0-5, where 0 is the highest and 5 is the lowest. The use of this log level helps you get to the root cause of a problem faster and displays the most critical log message.
Timestamp
Another efficient use of this logger is the capability to write each timestamp on the log output for the event once the level is logged. This is another best practice for the use of libraries. It also helps in monitoring all events that lead to an error or performance downtime in sequential order.
Conclusion
Logging files from different aspects of the application code to a single logger makes it an integral part of the application as stakeholders involved can easily trace and track each event on the log. Software engineers will find these practices ideal because crucial feedback can be gained for better application optimization. The log file pinpoints every root cause of the application’s problem when logged with a different log level that serves a different purpose.

Author
Philip Onuchukw
Philip Onuchukw, A software engineer, and a technical writer. With an immense passion for building reliable and efficient software products, converting his years of experience in the field of computer science into writing. He has articles published on developer blogs for both beginners and experienced software engineers.